

A stripped bolt can turn a simple repair into a full-blown garage nightmare. One minute you are swapping brake pads or replacing an exhaust part, and the next minute your wrench keeps slipping like a bald tire on black ice. Every car owner, DIY mechanic, and even professional technician eventually runs into this problem. The frustrating part is that stripped bolts rarely happen at a convenient time. They usually show up on rusted suspension parts, seized exhaust hardware, or hidden engine bay fasteners that already test your patience.
Recent automotive repair guides and mechanic discussions continue to highlight rust, over-tightening, and incorrect tool usage as the biggest causes of stripped bolts. Modern repair experts also emphasize using penetrating oil, controlled heat, and six-point sockets before jumping straight to drilling or cutting methods.
The good news? Most stripped bolts can still be removed without destroying surrounding parts or losing your sanity. The trick is understanding why the bolt failed in the first place and using the right removal strategy in the correct order. Think of bolt extraction like defusing a bomb. If you rush in aggressively, things usually get worse. If you approach it methodically, you often win without major damage.
Understanding What a Stripped Bolt Really Is
A stripped bolt is not always completely ruined. In many cases, the corners of the bolt head become rounded enough that the socket can no longer grip properly. Imagine trying to grab a melted ice cube with your fingers. There is simply nothing solid left to hold onto. That is exactly what happens when a bolt loses its sharp edges. Sometimes the threads themselves become damaged, but most automotive stripping issues happen at the head of the bolt or nut.
There is also a huge difference between a stripped bolt and a seized bolt. A stripped bolt refers to damaged gripping surfaces, while a seized bolt is frozen in place because of rust, corrosion, or heat cycles. Unfortunately, many automotive bolts become both stripped and seized at the same time, which creates the perfect storm of frustration. Exhaust manifold bolts are notorious for this because they endure constant heat expansion and cooling cycles.
One of the earliest warning signs is socket slippage. If your wrench suddenly feels loose or starts skipping across the bolt head, stop immediately. Continuing to force the tool often destroys the remaining grip surfaces. Mechanics frequently warn that repeated slipping is what turns a recoverable bolt into a drilling disaster.
You should also pay attention to corrosion around the fastener. Rust buildup around the threads acts almost like glue. Road salt, moisture, and temperature changes accelerate the process dramatically. Vehicles driven in snowy climates often suffer from severe bolt seizure because corrosion slowly fuses the metal together over time.
Why Bolts Become Stripped in the First Place
Most stripped bolts are not caused by bad luck. They happen because of a chain reaction involving improper tools, excessive force, corrosion, or rushed repair work. One of the biggest culprits is over-tightening. Modern impact wrenches make it incredibly easy to exceed proper torque specifications without realizing it. Once a bolt is stretched beyond its intended limits, the head becomes weaker and more vulnerable to rounding.
Automotive repair experts continue to warn against using oversized sockets or twelve-point sockets on stubborn bolts because they reduce gripping contact. A six-point socket grips the flat sides of the bolt head more securely, while a twelve-point socket can concentrate force on the corners. That extra stress often rounds the edges under heavy torque.
Rust is another major factor. Corrosion forms microscopic bonds between threads, especially in suspension systems and exhaust components. Heat cycling makes things even worse. Every time the metal expands and contracts, moisture creeps deeper into the threads. Over several years, bolts can practically weld themselves into place.
Here is a quick breakdown of common causes:
| Cause | Why It Happens | Result |
|---|---|---|
| Over-tightening | Excessive torque during installation | Rounded bolt head |
| Corrosion | Exposure to water and salt | Seized threads |
| Wrong socket size | Loose fit creates slippage | Damaged corners |
| Cheap tools | Poor grip and flexing | Faster stripping |
| Repeated removal | Metal fatigue over time | Weak bolt surfaces |
Interestingly, many online mechanic communities also point out that impatience plays a major role. People often rush straight to brute force without lubrication or preparation. That approach usually ends with snapped bolts, damaged threads, or expensive repairs.
Tools That Improve Grip on Damaged Bolts
The right tool can mean the difference between a five-minute repair and a weekend disaster. One of the most important upgrades is switching to six-point sockets. These sockets provide broader contact against the bolt head and reduce the chance of slipping. Professional mechanics almost universally recommend them for stubborn automotive fasteners.
Bolt extractor sockets are another lifesaver. These specialized sockets have reverse spiral teeth that bite into damaged bolt heads as torque increases. The more resistance the bolt gives, the harder the extractor grips. It is almost like a snake tightening around its prey. Extractor sockets work especially well on lug nuts, suspension bolts, and drain plugs.
Locking pliers also remain one of the oldest and most effective solutions. If enough of the bolt head is exposed, a high-quality set of locking pliers can clamp tightly enough to break the bolt loose. The key is maximizing surface contact and pulling steadily rather than jerking violently.
Breaker bars and wrench extenders are becoming increasingly popular because they allow controlled leverage instead of explosive force. Recent repair guides emphasize slow, consistent pressure rather than sudden movements. Sudden torque spikes often snap bolts entirely, which creates a much harder extraction problem.
Manual impact drivers deserve more attention too. These tools convert hammer strikes into rotational force, helping loosen stubborn fasteners while minimizing slippage. They work particularly well on brake rotor screws and smaller engine fasteners where conventional ratchets fail.
Techniques That Work Before Drilling Becomes Necessary
Drilling should never be your first move. Once you drill into a bolt, there is no easy reset button. Before going nuclear, several less destructive techniques often succeed surprisingly well.
One of the most effective strategies is the tighten-then-loosen method. It sounds backward at first, but slightly tightening the bolt can break the corrosion bond before attempting removal. Mechanics frequently describe it as cracking ice before lifting it off the windshield. The initial clockwise movement fractures rust buildup and allows penetrating oil to seep deeper into the threads.
The hammer shock method is another underrated technique. Sharp taps with a hammer help break rust adhesion without applying massive torque. Think of it like waking up a stuck thread rather than forcing it awake. Recent repair experts continue to recommend light impacts before using breaker bars or extractors.
Here is a practical sequence that often works:
- Apply penetrating oil generously
- Wait at least 15 to 30 minutes
- Tap the bolt head lightly with a hammer
- Tighten slightly before loosening
- Use a six-point socket and steady pressure
- Repeat if necessary
Patience matters enormously here. Many penetrating oils need time to creep into microscopic gaps. Some experienced mechanics even recommend overnight soaking for heavily rusted suspension or exhaust bolts.
If the bolt begins moving, avoid spinning it out immediately. Rock it back and forth gradually. This motion continues breaking corrosion apart while reducing the risk of snapping the fastener inside the component.
Applying Heat and Penetrating Oil Safely
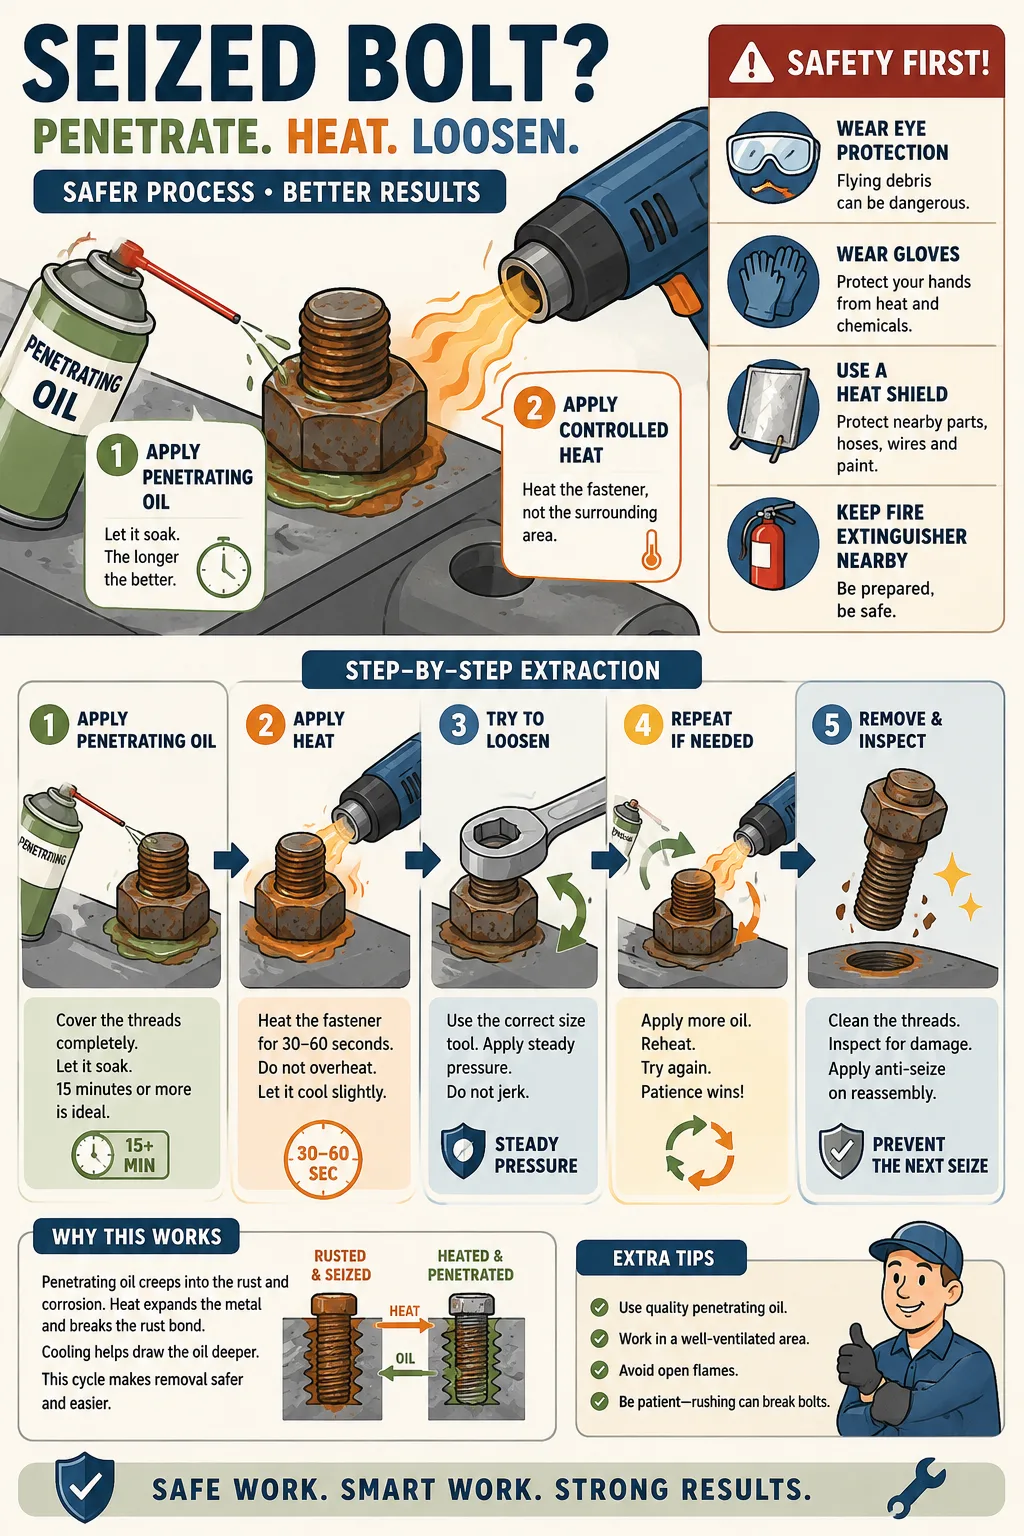
Heat can feel like magic when dealing with seized automotive bolts. Metal expands when heated, which helps break the bond between threads. Combined with penetrating oil, heat often transforms an impossible bolt into an easy removal job. But using heat carelessly can damage nearby components or even create fire hazards.
Experts recommend heating the surrounding metal rather than the bolt itself whenever possible. The goal is to expand the housing around the threads, creating microscopic gaps for movement. Propane torches work for moderate jobs, while MAPP gas burns hotter and penetrates heavy corrosion more effectively.
Safety becomes critical when applying heat near fuel lines, rubber bushings, wiring harnesses, or plastic engine components. Heat can melt insulation, ignite oil residue, or weaken sensitive parts. Experienced mechanics often use metal heat shields or wet rags to protect surrounding areas.
Penetrating oil selection also matters more than people think. Many repair professionals specifically warn that WD-40 is not a true penetrating oil. Dedicated products like PB Blaster, Kroil, or specialized rust penetrants generally perform far better on seized bolts.
Timing is important too. Applying oil immediately after heating creates thermal contraction that helps draw lubricant deeper into the threads. Some mechanics even use wax because melted wax can wick into tight spaces remarkably well.
Never spray flammable penetrants directly onto open flames. Allow the area to cool slightly first. A little patience is safer than turning your engine bay into a barbecue pit.
Removing Bolts in Tight or Rusted Areas
Some stripped bolts seem deliberately designed to ruin your day. Exhaust manifold studs, suspension bolts, subframe fasteners, and oil drain plugs often live in cramped spaces filled with rust, grime, and limited tool access. These are the situations where strategy matters more than brute strength.
Exhaust components are especially difficult because of repeated heat cycles. Over time, the bolts essentially bake themselves into place. Online mechanic communities frequently warn that these bolts often snap even when handled carefully.
Working in tight areas usually requires specialized tools like swivel sockets, flex-head ratchets, crowfoot wrenches, or compact impact tools. In some cases, removing nearby components for better access actually saves time overall. That may sound counterproductive, but trying to force tools into awkward angles often strips bolts even faster.
Suspension bolts present another challenge because corrosion can extend through the entire bolt shaft rather than just the threads. These bolts may require hammering, air hammers, or even cutting tools after the nut is removed. Mechanics frequently recommend cleaning exposed threads with a wire brush before attempting removal.
If you are dealing with aluminum engine components, caution becomes even more important. Steel bolts threaded into aluminum can seize aggressively because of galvanic corrosion. Excessive force may strip the softer aluminum threads long before the bolt moves.
In extreme situations, cutting the bolt head off and removing the remaining shank later may be safer than risking damage to expensive surrounding parts. It is not glamorous, but sometimes controlled destruction is the smartest path forward.
Mistakes That Can Make Extraction Harder
One bad decision can transform a manageable repair into a nightmare. The biggest mistake is continuing after the socket begins slipping. Every failed attempt rounds the bolt further and reduces your remaining extraction options. Once the head becomes completely smooth, even extractor sockets may struggle.
Another common mistake is using adjustable wrenches or cheap multi-fit sockets. These tools rarely grip tightly enough for seized automotive fasteners. Instead of transferring force efficiently, they flex and slip under load.
Excessive force is another disaster waiting to happen. Many people assume a bigger breaker bar automatically solves the problem, but uncontrolled leverage often snaps bolts clean off. A broken stud recessed inside an engine block is far more difficult than a partially stripped bolt head.
Here are several mistakes you should avoid:
| Mistake | Why It Hurts |
|---|---|
| Using wrong socket size | Causes slipping and rounding |
| Applying sudden force | Increases snapping risk |
| Skipping penetrating oil | Leaves corrosion intact |
| Heating near sensitive parts | Can damage wiring and rubber |
| Drilling off-center | Destroys surrounding threads |
Drilling errors deserve special attention. Poor alignment can damage the threaded hole itself, making reinstallation extremely difficult. Left-handed drill bits are often recommended because they sometimes grab and remove the bolt during drilling.
Another overlooked mistake is impatience with penetrating oil. Many people spray and immediately crank on the bolt. Experts consistently emphasize allowing enough soak time for the lubricant to work properly.
How to Protect Surrounding Components During Removal
Protecting nearby components is just as important as removing the bolt itself. One careless torch movement or slipping breaker bar can damage hoses, sensors, wiring, or painted surfaces. Modern engine bays are packed tighter than ever, which means collateral damage happens easily.
Heat shielding is one of the simplest preventive measures. Thin metal plates, welding blankets, or even damp shop towels can help protect sensitive components during torch work. Rubber bushings and plastic connectors are especially vulnerable to radiant heat.
Thread protection matters too. If the bolt starts moving but feels rough, stop periodically and clean the exposed threads. Wire brushes, compressed air, and additional penetrating oil can reduce thread galling during removal.
When hammering or chiseling, control your striking angle carefully. One misplaced hit can crack aluminum housings or damage nearby brake lines. Mechanics often use sacrificial nuts threaded partially onto exposed bolts before hammering to protect the threads from mushrooming.
You should also pay attention to electrical safety. Disconnecting the battery before heavy torch work or grinding is often a smart precaution. Sparks and electronics do not always get along nicely.
Sometimes the smartest move is simply knowing when to stop. If a bolt feels close to snapping inside a critical component, professional extraction may save significant money in the long run.
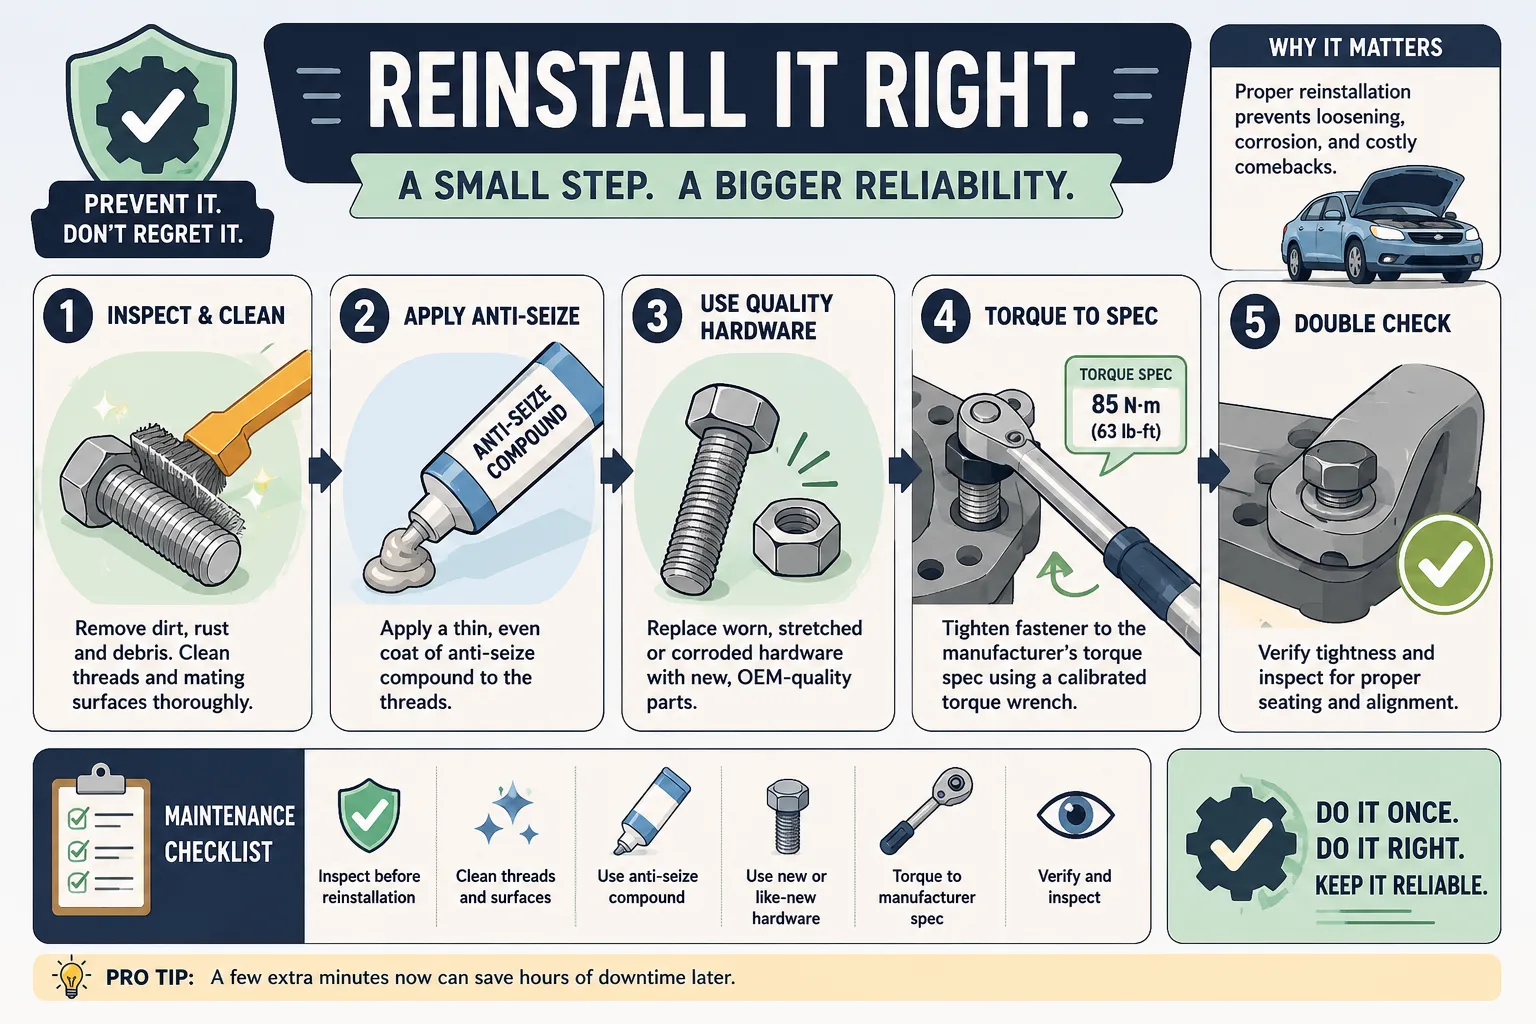
Preventing Future Bolt Damage During Reinstallation
Once you finally remove the stripped bolt, the last thing you want is repeating the same nightmare later. Proper reinstallation habits dramatically reduce future seizure and stripping problems.
Torque specifications matter far more than many DIYers realize. Over-tightening is one of the leading causes of damaged fasteners. Modern torque wrenches eliminate guesswork and help ensure even clamping force. Think of torque specs like baking instructions. Too little pressure and things fall apart. Too much pressure and you burn everything.
Anti-seize compounds are extremely valuable on exhaust hardware, suspension bolts, and spark plugs. These lubricants reduce corrosion and prevent threads from bonding together over time. Many classic car experts strongly recommend copper-based anti-seize for high-heat automotive applications.
Here is a quick prevention checklist:
- Use the correct socket size every time
- Prefer six-point sockets for stubborn fasteners
- Clean threads before installation
- Apply anti-seize where appropriate
- Follow manufacturer torque specifications
- Replace heavily corroded hardware
- Avoid excessive impact wrench torque
Thread cleanliness also matters. Dirt and rust increase friction dramatically, which can create false torque readings during installation. Cleaning threads with a tap or thread chaser improves accuracy and reduces future seizure risks.
Replacing damaged bolts is another smart investment. Reusing heavily rounded or stretched hardware may save a few dollars now but can create much bigger headaches later.
Conclusion
Removing a stripped bolt from a car is part mechanical skill, part patience, and part strategy. The process becomes much easier when you understand why bolts fail and how corrosion, heat, and improper tool usage all contribute to the problem. In many cases, the solution is not brute force but smarter force.
Penetrating oil, heat, six-point sockets, extractor tools, and controlled leverage consistently prove more effective than aggressive hammering or oversized breaker bars alone. Recent repair experts continue emphasizing preparation, patience, and gradual escalation rather than immediately drilling or cutting.
The best repair approach is always prevention. Proper torque, anti-seize compounds, and quality tools can dramatically reduce future stripping issues. Every successful bolt extraction also teaches a valuable lesson: slow and methodical usually beats fast and forceful in automotive repair work.
A stripped bolt may feel like the enemy at first, but with the right techniques, it becomes just another repair challenge you know how to beat.
FAQs
1. Can WD-40 remove a stripped or seized bolt?
WD-40 can help slightly, but it is primarily a water displacement product rather than a dedicated penetrating oil. Most mechanics recommend specialized penetrating oils like PB Blaster or Kroil for heavily rusted bolts.
2. Should I use heat before or after penetrating oil?
Typically, you apply heat first and then penetrating oil after the metal cools slightly. This helps draw the oil deeper into the threads through thermal contraction.
3. What is the best socket type for stripped bolts?
Six-point sockets are generally the best choice because they grip the flat sides of the bolt head more securely than twelve-point sockets.
4. When should I drill out a stripped bolt?
Drilling should be the last resort after penetrating oil, extractor sockets, heat, hammer shock, and controlled leverage techniques have failed.
5. Is it safe to reuse a stripped bolt after removal?
No. Once a bolt has been significantly rounded, stretched, or weakened, replacing it is usually the safest and most reliable option.

Marco Vestri is a 29-year-old American content writer based in Spokane, Washington. He specializes in creating well-researched automotive maintenance guides, troubleshooting articles, and practical ownership advice for everyday drivers. His work emphasizes accuracy, clear explanations, and reliable sources, helping readers make informed decisions with confidence. As a regular contributor to carissues.wiki, Marco combines years of blogging experience with a passion for simplifying complex vehicle topics into useful, trustworthy content for a broad audience.