
Rust on a car is a little like a cavity in a tooth. Ignore it long enough, and what started as a tiny orange-brown spot can slowly eat through the metal underneath. Many drivers think surface rust is only cosmetic, but the truth is that corrosion spreads faster than most people expect, especially in humid climates, rainy regions, and areas where roads are salted during winter. Recent automotive repair guidance shows that untreated surface rust can quickly evolve into scale rust and eventually structural corrosion if moisture keeps reaching exposed metal.
The good news is that surface rust is usually repairable at home if you catch it early. You do not need a full body shop setup to stop rust from spreading. With the right sanding techniques, proper cleaning, quality rust converters, and a careful repainting process, you can restore the damaged area and protect your vehicle from future corrosion. The key is understanding the process from start to finish instead of simply painting over rust and hoping for the best.
Before grabbing sandpaper or spray paint, it helps to understand exactly what surface rust looks like and why timing matters. Small rust spots often hide beneath chipped paint, scratches, bubbling clear coat, or moisture-trapping dirt. Once oxygen and water reach exposed steel, oxidation begins almost immediately. If you have ever seen a tiny rust speck suddenly become a blistered patch six months later, you have already witnessed how aggressively corrosion can spread when ignored.
Understanding What Surface Rust Really Is
Surface rust is the earliest and least severe stage of metal corrosion, but it still deserves immediate attention. It develops when the protective paint layer on a vehicle gets chipped, scratched, or weakened enough for moisture and oxygen to contact exposed steel. Think of your car’s paint as armor. Once that armor cracks, the metal underneath becomes vulnerable to the environment every single day. Rainwater, humidity, road salt, mud, and even trapped dust can accelerate the oxidation process surprisingly fast.
How Surface Rust Forms on Vehicle Panels
Most surface rust begins in tiny imperfections that drivers barely notice. Stone chips on the hood, scratches near door handles, bubbling paint around wheel wells, and poorly repaired dents are all common starting points. According to recent automotive rust repair guides, wheel arches, rocker panels, undercarriages, and door edges remain some of the most rust-prone areas because they are constantly exposed to moisture and debris.
Surface rust initially appears as a light orange or brown discoloration. At this stage, the corrosion usually affects only the top layer of metal. The problem is that rust is not stable. Once it starts, it spreads underneath paint and weakens the surrounding metal. A small rust spot can become blistered, flaky, and structurally dangerous if left untreated for too long.
Difference Between Surface Rust and Structural Rust
Understanding the severity of rust helps determine whether a DIY repair is realistic. Surface rust sits on top of the metal and usually has not eaten deeply into the panel yet. Scale rust is more aggressive and often causes pitting or rough textures in the metal. Structural rust is the worst-case scenario because it compromises the strength of the vehicle itself.
Here is a simple comparison:
| Rust Type | Appearance | Severity | DIY Repair Possible |
|---|---|---|---|
| Surface Rust | Light orange or brown spots | Mild | Yes |
| Scale Rust | Flaking, bubbling, rough texture | Moderate | Sometimes |
| Structural Rust | Holes, weakened metal | Severe | Usually requires professional repair |
If you press gently on a rusted area and the metal feels soft or brittle, the damage may already be structural. Automotive experts recommend professional repair when rust has penetrated through the panel or spread underneath welded sections.

Spotting Surface Rust Before It Gets Worse
Catching rust early is half the battle. Most people notice rust only after it becomes visible from several feet away, but corrosion usually starts quietly beneath paint long before that point. Learning how to identify early warning signs can save hundreds or even thousands of dollars in future repairs.
Common Places Rust Starts on Cars
Cars do not rust evenly. Certain areas are exposed to more moisture, salt, and road debris than others. Wheel wells are notorious rust zones because dirt and water collect there constantly. Door bottoms are another common problem area because drainage holes can clog, trapping water inside the panel. Roof edges, trunk seams, and rocker panels also experience heavy exposure over time.
Vehicles driven in snowy climates face even greater risk due to road salt. Salt lowers the freezing point of water but dramatically speeds up corrosion. Coastal regions create similar problems because salty ocean air contains moisture-rich particles that settle onto exposed metal surfaces.
Drivers should inspect these areas regularly:
- Wheel arches
- Undercarriage sections
- Door edges
- Hood chips
- Trunk seams
- Around windshield trim
- Lower rocker panels
Warning Signs Drivers Often Ignore
Rust rarely appears overnight. Usually, the car gives subtle clues first. Bubbling paint is one of the biggest warning signs because it often means corrosion is growing underneath the surface. Tiny brown dots around scratches or chips are another red flag. Some drivers also notice rough textures when washing their vehicles.
A recent repair guide noted that discoloration, bubbling, and rough spots are among the clearest early indicators of rust formation. Many people mistakenly think waxing over these spots will stop corrosion, but wax only seals the symptom temporarily. The rust underneath continues spreading quietly like tree roots under concrete.
Ignoring these warning signs creates bigger problems because corrosion expands outward beneath paint. What looks like a coin-sized rust patch may actually be much larger under the surrounding finish. That is why immediate repair matters so much.
Preparing the Car Before Rust Repair
Preparation determines whether a rust repair lasts six months or six years. Many failed DIY repairs happen because the area was dirty, oily, or poorly prepped before sanding and painting began. Skipping preparation is like building a house on wet sand. The final result may look acceptable at first, but it will eventually fail.
Cleaning the Area Properly
Start by thoroughly washing the damaged section using automotive soap and water. Remove road grime, grease, wax residue, and dirt completely. Even microscopic contaminants can interfere with sanding, primer adhesion, and paint durability. After washing, dry the surface completely because trapped moisture can continue feeding corrosion underneath the repair.
Many professionals also wipe the area with wax and grease remover before sanding begins. This extra step removes invisible oils that ordinary soap may leave behind. If you sand a dirty surface, you risk grinding contaminants deeper into the metal.
Recent rust repair recommendations stress that cleaning loose rust, grease, and debris before treatment is essential for successful rust conversion and primer bonding.
Tools and Materials You Will Need
Having the correct tools nearby prevents rushed mistakes during the repair process. Here are the essentials most DIY surface rust repairs require:
| Tool or Material | Purpose |
|---|---|
| Sandpaper (80–1000 grit) | Removing rust and smoothing surfaces |
| Wire brush | Loosening flaky rust |
| Rust converter | Neutralizing remaining corrosion |
| Automotive primer | Protecting bare metal |
| Touch-up paint | Restoring color |
| Clear coat | Adding durability and shine |
| Masking tape | Protecting surrounding paint |
| Microfiber cloths | Cleaning dust and debris |
| Safety gloves and mask | Personal protection |
A clean, organized workspace also matters. Wind, dust, and humidity can affect paint quality dramatically. If possible, work indoors or in a shaded garage environment with good ventilation.
Sanding Techniques That Remove Rust Effectively
Sanding is the heart of rust repair. Done properly, it removes corrosion completely and creates a stable foundation for primer and paint. Done poorly, it either leaves rust behind or damages healthy paint around the repair zone.
Choosing the Right Sandpaper Grit
Different sanding stages require different grit levels. Coarse sandpaper cuts aggressively and removes rust quickly, while finer grits smooth the surface before painting. Most DIY repairs begin with 80-grit or 120-grit sandpaper to strip rust and damaged paint away. Automotive repair discussions frequently recommend 80-grit for initial rust removal because it cuts effectively through oxidized metal.
After the rust is removed, finer grits like 320, 600, and even 1000 grit smooth the repair area before primer and paint application. The transition between grits matters because rough sanding scratches can show through fresh paint if not refined properly.
Manual Sanding vs Power Tools
Hand sanding gives better control for small repairs, especially near curves and edges. Power tools like orbital sanders and wire wheels speed up the process but can remove too much material if used carelessly. Think of power tools like chainsaws. They are efficient, but they punish mistakes instantly.
For tiny rust spots, manual sanding is usually safer. Larger patches may benefit from a drill-mounted wire wheel or sanding disc. Some professional body technicians use angle grinders with specialized abrasive wheels for faster removal, but beginners should approach aggressive tools carefully.
Community repair discussions consistently emphasize removing all loose rust before applying converters or primer. Even tiny remaining rust pockets can restart corrosion beneath fresh paint later.
Avoiding Damage to Surrounding Paint
Masking tape protects nearby paint from accidental scratches and overspray. Sand slightly beyond the visible rust area because hidden oxidation often extends farther underneath the paint edge. Feather the transition between bare metal and painted surfaces smoothly so the repair blends naturally after painting.
Rushing this step often creates visible ridges or uneven paint texture later. A properly feathered repair should feel smooth when you run your fingers across it.
Using Rust Converters and Primers Correctly
Many people misunderstand rust converters. They are not magic liquids that permanently erase rust without preparation. Instead, they chemically transform remaining oxidation into a stable, paintable surface. Used properly, they are extremely effective. Used carelessly, they can trap corrosion underneath fresh paint.
How Rust Converters Work
Rust converters typically use tannic acid or phosphoric acid chemistry to react with iron oxide. The rust changes into a darker, stable compound that can be primed and painted. Several modern products combine rust conversion and primer functionality into one coating.
Recent product guides explain that converters work best after loose rust and debris are removed first. This is important because converters cannot penetrate thick flaky corrosion effectively. Think of them as a stabilizer rather than a substitute for proper sanding.
Many converters turn black or dark purple after application. That color shift usually indicates the chemical reaction is working. Experts recommend allowing full curing time before applying paint because rushing this stage can weaken adhesion later.
Applying Primer the Right Way
Primer acts as the bridge between bare metal and paint. Without primer, paint struggles to bond correctly and becomes vulnerable to moisture intrusion. Self-etching primers are popular for automotive rust repair because they chemically bond to metal surfaces while resisting corrosion.
Apply primer in thin, even coats instead of one heavy layer. Heavy coats tend to drip, trap solvents, and dry unevenly. Automotive repair recommendations suggest extending primer slightly beyond the repair area for proper blending.
Here is a quick comparison of common primer types:
| Primer Type | Best Use | Rust Protection |
|---|---|---|
| Self-Etching Primer | Bare metal repairs | High |
| Epoxy Primer | Maximum durability | Very High |
| Filler Primer | Smoothing imperfections | Moderate |
Allow proper drying time between coats and sand lightly with fine grit paper if necessary before painting.
Painting Over the Repaired Area
Painting is where patience pays off visually. Even a perfectly sanded and primed repair can look terrible if paint is sprayed carelessly. Thin layers and controlled application matter much more than speed.
Matching the Original Paint Color
Modern vehicles usually include a factory paint code sticker inside the driver-side door jamb or under the hood. Matching this code ensures the repair blends with the surrounding finish. Even slight shade differences become obvious under sunlight.
Spray paint cans designed for automotive touch-ups work surprisingly well for small repairs. Warm paint cans slightly before use because temperature affects spray consistency. Repair experts often recommend applying multiple thin coats rather than one thick pass.
Hold the spray can roughly 20 to 25 centimeters away from the surface while moving steadily. Stopping mid-spray creates blotchy texture and uneven coverage. Think of spray painting like mowing grass. Smooth overlapping passes produce the cleanest results.
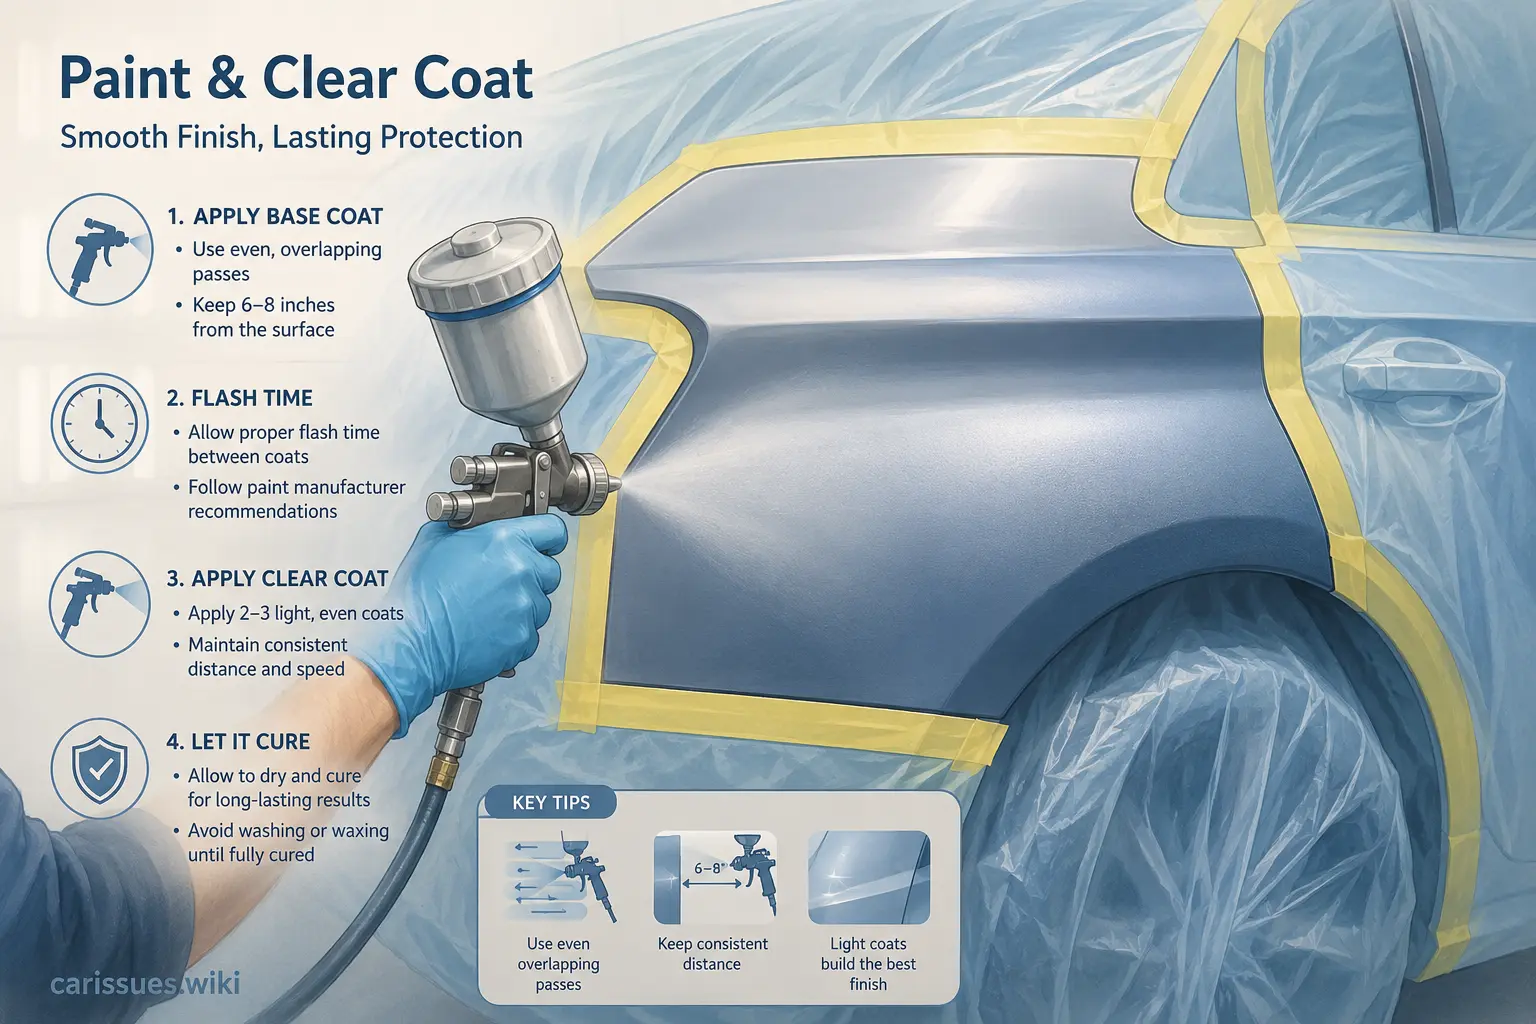
Applying Clear Coat for Protection
Clear coat protects the color layer from UV damage, moisture, and environmental contamination. Without clear coat, repaired paint can fade, oxidize, or chip prematurely. Apply clear coat after the color coat flashes and dries according to product instructions.
A quality clear coat also improves gloss and helps the repair blend with the surrounding factory finish. Some DIY enthusiasts skip this step because the repair initially looks acceptable without it. Unfortunately, the paint usually deteriorates faster afterward.
Light wet sanding with ultra-fine grit paper followed by polishing can improve the final appearance dramatically once the clear coat fully cures.
Protecting the Surface From Future Rust
Removing rust is only half the job. Preventing it from returning matters just as much. Corrosion thrives in neglected environments, especially when moisture sits on exposed metal repeatedly.
Washing and Maintenance Habits
Regular washing removes dirt, salt, and contaminants before they can attack paint and metal. During winter, undercarriage washing becomes especially important because road salt accumulates underneath the vehicle.
Many people wash only the visible exterior while ignoring wheel wells and lower panels where rust often begins. That is like brushing your teeth while ignoring your gums. The hidden areas matter just as much.
Waxing also provides a temporary protective barrier against moisture. Ceramic coatings offer even longer-lasting protection because they create a hydrophobic layer that repels water effectively.
Protective Coatings and Sealants
Rustproofing sprays, undercoatings, and cavity waxes add another layer of defense against corrosion. Some professional-grade products penetrate seams and hidden cavities where moisture collects. Recent rust treatment guides also emphasize pairing rust converters with protective coatings for long-term durability.
Drivers in coastal or snowy regions benefit most from these treatments because their vehicles face constant exposure to corrosive conditions.
Here are common rust prevention methods:
| Protection Method | Effectiveness | Longevity |
|---|---|---|
| Waxing | Moderate | 2–3 months |
| Ceramic Coating | High | 1–5 years |
| Undercarriage Coating | Very High | 1–3 years |
| Rustproofing Spray | High | Annual application |
Routine inspections matter too. Catching tiny chips early prevents them from becoming major rust repairs later.
Common Mistakes That Make Rust Return Faster
One of the biggest mistakes people make is painting directly over rust without fully removing or treating it first. Fresh paint may hide the problem temporarily, but trapped corrosion continues spreading underneath like mold behind wallpaper.
Another common issue is insufficient sanding. If rust remains embedded in pits or edges, the repair may fail within months. Some DIY repairs also skip primer entirely, which weakens paint adhesion and moisture resistance.
Humidity and poor drying conditions create additional problems. Applying paint in damp environments traps moisture beneath coatings, essentially sealing water against the metal. Rushing drying times between primer, paint, and clear coat layers can also reduce durability dramatically.
Community repair discussions repeatedly highlight poor preparation as the main reason rust returns quickly. Even high-quality rust converters struggle when loose corrosion, grease, or unstable paint remain underneath.
Another mistake is ignoring surrounding rust spread. The visible spot may only represent part of the damaged area. Sanding too narrowly often leaves hidden corrosion around the edges, allowing rust to reappear later.
Patience is what separates lasting repairs from temporary cosmetic fixes. A careful, methodical approach almost always produces better long-term results than trying to finish everything quickly in a single afternoon.
Conclusion
Surface rust may seem harmless at first glance, but it rarely stays small forever. Left untreated, tiny corrosion spots can spread beneath paint, weaken metal panels, and eventually require expensive bodywork repairs. The smartest approach is catching rust early and handling it correctly before it evolves into something far more serious.
A successful repair starts with proper cleaning and inspection. Once the area is prepared, effective sanding removes unstable corrosion while rust converters stabilize any remaining oxidation. Primers create a protective foundation, and careful paint application restores the appearance while sealing the metal from moisture. Long-term protection depends on regular washing, rustproofing habits, and addressing future paint chips immediately.
The process takes patience, but it is absolutely manageable for most DIY car owners. Treat rust like a weed in a garden. Pull it out early, protect the surrounding area, and it becomes far easier to control before it spreads everywhere.
FAQs
1. Can surface rust on a car be completely removed?
Yes, surface rust can usually be removed completely if caught early. Proper sanding, rust conversion, priming, and repainting can stop corrosion before it penetrates deeply into the metal.
2. What grit sandpaper is best for removing car rust?
Most repairs start with 80-grit or 120-grit sandpaper for rust removal, then progress to finer grits like 320, 600, or 1000 for smoothing before painting.
3. Do rust converters actually work?
Yes, rust converters work when used correctly. They chemically transform remaining oxidation into a stable surface that can be primed and painted. They are most effective after loose rust is removed first.
4. How long does a DIY rust repair last?
A properly completed repair can last several years, especially when protected with primer, clear coat, and regular maintenance. Poor preparation usually causes repairs to fail much sooner.
5. Is it okay to paint directly over rust?
Painting directly over untreated rust is not recommended. The corrosion will continue spreading underneath the paint, eventually causing bubbling, peeling, and larger repairs.