
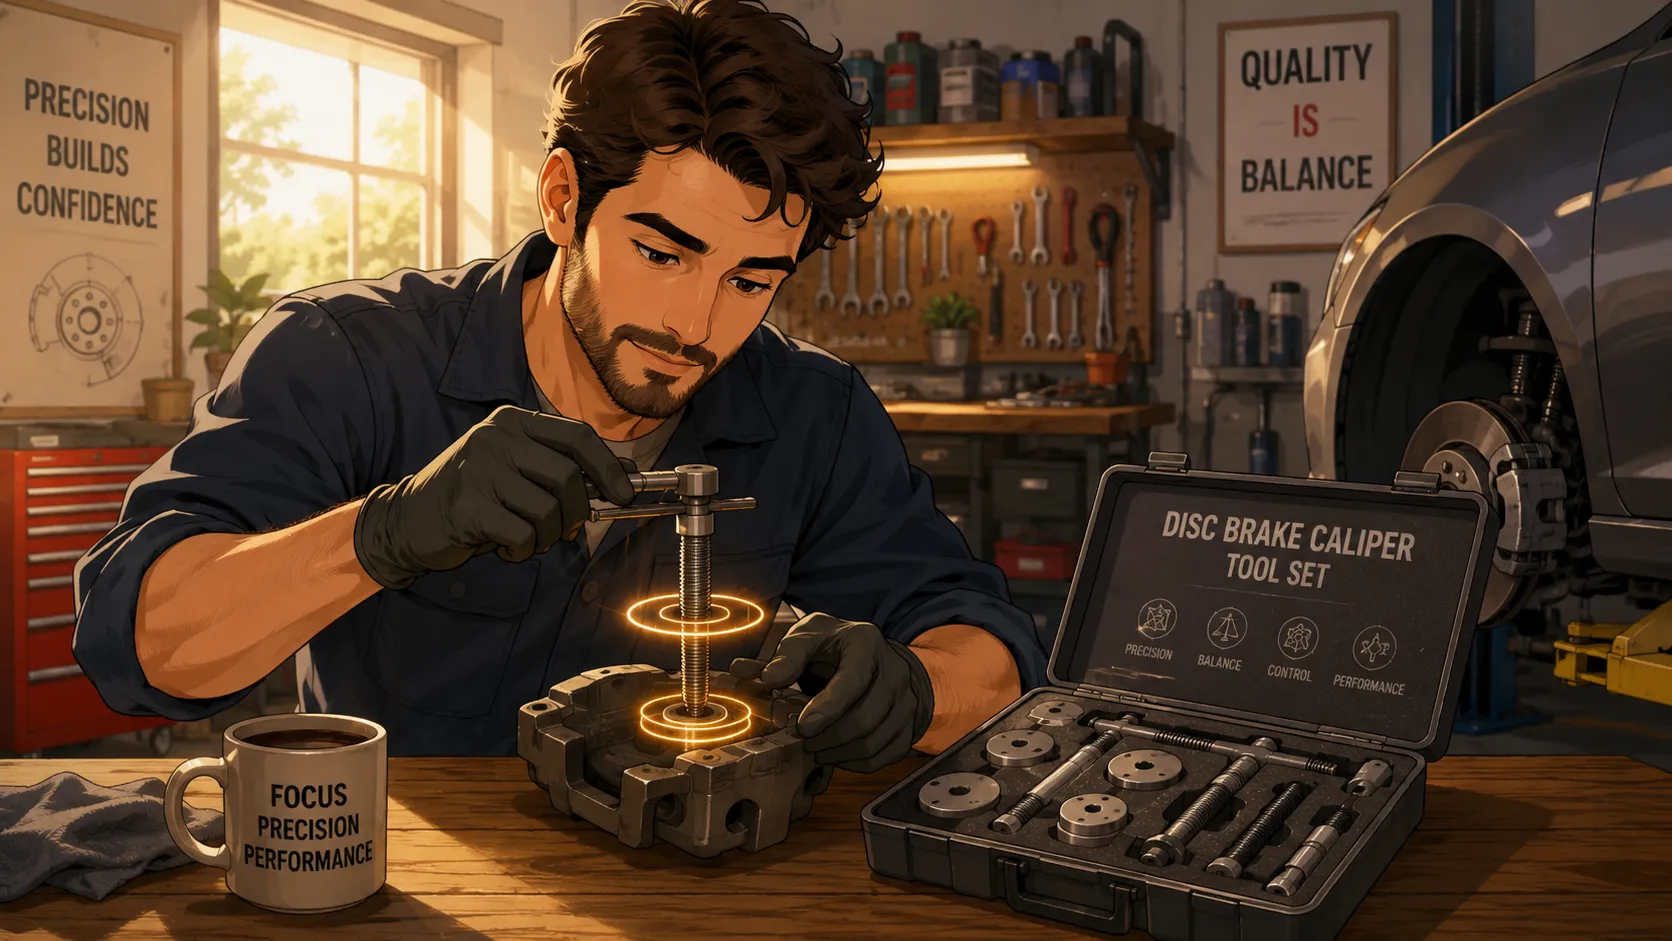
Working on your own brakes can feel intimidating the first time you stare at a stubborn rear caliper piston that refuses to move. Many DIY mechanics discover very quickly that pressing harder with pliers or a screwdriver only makes things worse. That is exactly why a disc brake caliper tool set exists. These specialized kits are designed to retract brake pistons safely and evenly without damaging the delicate seals, boots, or internal parking brake mechanism hidden inside the caliper. Modern rear brake systems are more complicated than many people realize, and using the wrong method can easily turn a simple brake pad replacement into an expensive caliper repair.
Recent brake service guides and professional tool manufacturers emphasize that many rear disc brake systems require the piston to rotate while being compressed at the same time. This design is especially common on vehicles where the parking brake is integrated into the rear caliper assembly. Instead of simply pushing the piston inward like many front brakes, the rear piston travels along an internal threaded mechanism. Think of it like tightening a screw into wood. You cannot just push the screw downward and expect it to sink properly. You have to rotate it while applying pressure.
Learning how to properly use a brake caliper wind-back tool not only saves money but also prevents dangerous mistakes that can affect braking performance. Whether you are replacing worn pads on a family sedan or maintaining a performance vehicle, understanding how the tool works makes the entire job smoother and safer. Once you understand the relationship between the piston, adapter plates, and compression mechanism, the process becomes surprisingly manageable even for beginners.
Understanding Why Brake Pistons Need Special Tools
Rear brake calipers are engineered differently from many front brake systems because they often contain a built-in parking brake mechanism. This design changes everything about how the piston retracts during a brake job. A standard front caliper piston can usually be compressed straight back into the bore using a clamp because hydraulic pressure alone operates the piston. Rear calipers, however, frequently rely on an internal threaded assembly connected to the parking brake lever. That means the piston cannot simply be forced inward. It must rotate and compress together in a controlled motion.
8
Professional brake tool manufacturers explain that forcing these pistons inward with pry bars or channel-lock pliers often damages piston seals and rubber boots. Once the rubber boot tears, moisture and road debris begin attacking the piston surface. Over time, corrosion develops inside the caliper, eventually causing sticking brakes, uneven pad wear, overheating rotors, or brake fluid leaks. What started as a quick brake pad swap suddenly becomes a costly repair involving replacement calipers and bleeding the entire brake system.
The special design of these pistons is also why you see grooves, slots, or small holes on the piston face. Those markings are not random. They allow the adapter pins from the tool set to grip the piston securely during rotation. Without the correct adapter, the piston slips, the surface becomes gouged, and the mechanic loses proper leverage. Some vehicles even use left-hand threaded pistons on one side and right-hand threads on the other. That is why comprehensive tool kits include multiple threaded drivers and adapter discs.
This system might seem unnecessarily complicated at first, but it serves an important purpose. The threaded mechanism allows the parking brake to maintain holding force mechanically rather than relying only on hydraulic pressure. In other words, the caliper functions almost like a miniature screw jack hidden inside your braking system. Once you understand that concept, the need for a dedicated disc brake piston tool set suddenly makes perfect sense.
Understanding the Different Pieces Inside the Tool Set
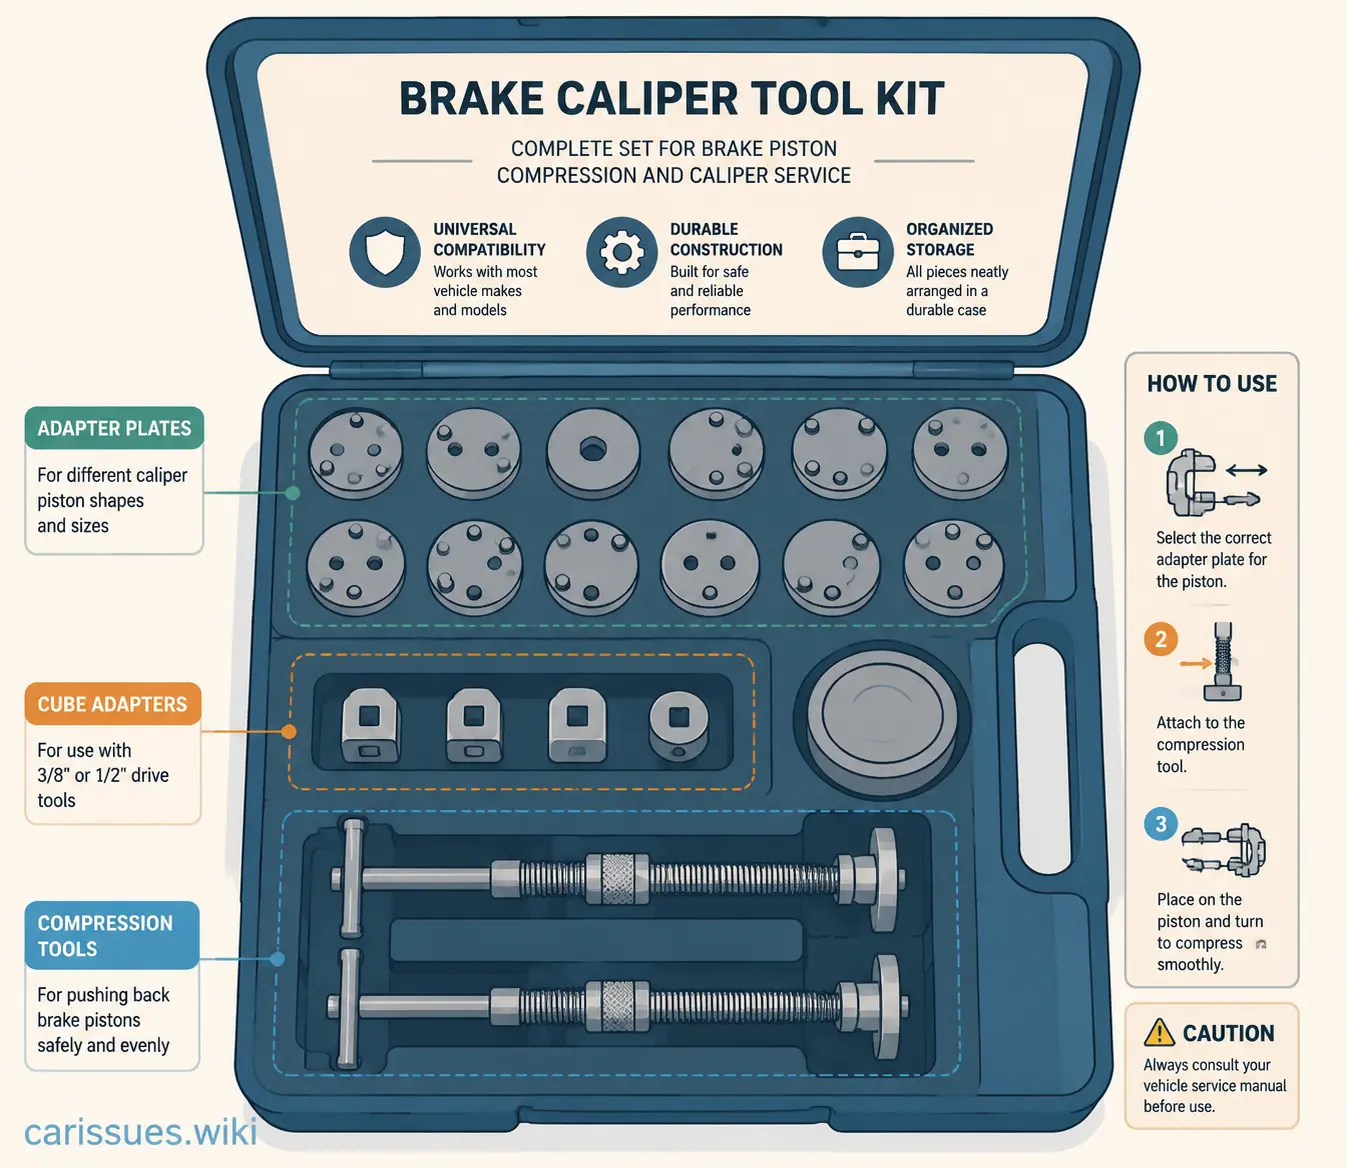
Opening a brake caliper tool kit for the first time can feel like dumping out a box of puzzle pieces with no instructions. There are adapter plates with different pin patterns, threaded rods, reaction plates, forcing screws, and sometimes both left-hand and right-hand rotating assemblies. At first glance, it looks far more complicated than necessary. Once you understand the role of each component, though, the entire setup becomes logical and easy to use.
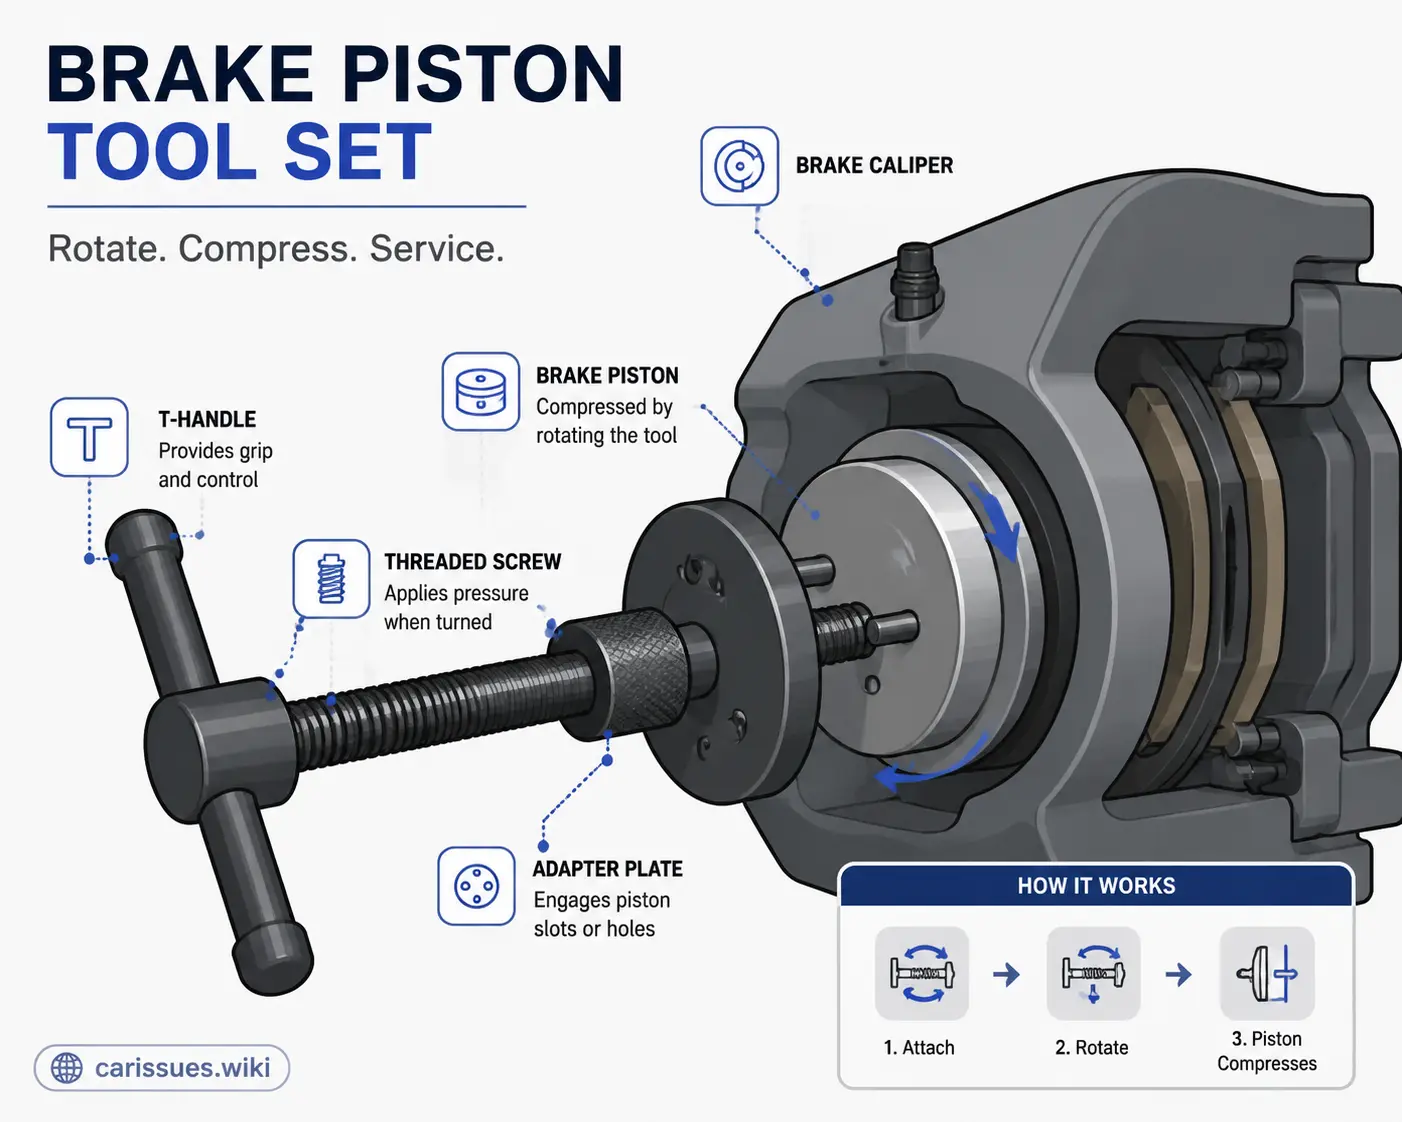
The heart of the kit is usually the threaded compression mechanism. This piece applies steady inward pressure while simultaneously rotating the piston. Unlike improvised methods that rely on brute force, the threaded design distributes pressure evenly across the piston face. That even force matters because brake pistons contain delicate internal seals that can easily become distorted if compressed unevenly. Many professional-grade kits are specifically designed to protect these seals during brake service.
Adapter plates are the second major component inside the kit. These discs contain various pin layouts that match different piston slot designs across vehicle manufacturers. Some pistons have two notches, others have four small holes, and some use unique pin spacing specific to certain automakers. Using the wrong adapter is like trying to use the wrong key in a lock. It may partially fit, but it will not engage correctly. That is why better tool kits include a wide selection of adapters covering both domestic and imported vehicles.
| Tool Component | Purpose | Why It Matters |
|---|---|---|
| Forcing Screw | Compresses piston inward | Prevents uneven pressure |
| Adapter Plates | Match piston slot patterns | Avoids slipping and damage |
| Reaction Plate | Stabilizes caliper during compression | Maintains alignment |
| Left/Right Thread Drivers | Matches piston thread direction | Prevents internal damage |
Some kits also include universal cube adapters. These compact tools fit onto a ratchet and provide several pin configurations in one piece. While convenient for occasional DIY jobs, they usually require more manual pressure and less precision than full wind-back kits. Mechanics often prefer dedicated threaded assemblies because they allow smoother, more controlled piston movement.
Understanding the individual pieces inside the kit transforms the brake job from guesswork into a controlled mechanical process. Instead of wrestling with stubborn pistons and risking damage, you begin working with the caliper rather than against it.
Preparing the Brake Assembly Before Compression
Before touching the piston compression tool, preparation matters more than most people realize. Rushing into the job without properly preparing the brake assembly is one of the biggest reasons people struggle with rear brake installations. Brake systems operate under hydraulic pressure, and even a small oversight can create resistance that makes the piston seem completely seized.
The first priority is safely lifting and securing the vehicle. A stable jack stand setup is essential because brake work requires leverage and controlled force. Trying to compress a piston while the vehicle shifts on an unstable jack is not only frustrating but genuinely dangerous. Once the wheel is removed, inspect the brake assembly carefully before loosening anything. Look for fluid leaks, torn boots, corrosion, or signs of uneven pad wear. These clues often reveal deeper problems inside the caliper.
6
One commonly overlooked step is opening the brake fluid reservoir cap. Mechanics and experienced DIYers frequently mention that leaving the reservoir sealed creates hydraulic resistance during piston compression. Imagine trying to push a syringe inward while blocking the outlet with your finger. Pressure builds instantly. Opening the cap allows brake fluid to flow backward more freely through the system.
Another critical step is verifying the parking brake status. Rear pistons integrated with parking brake systems cannot retract properly if the parking brake remains engaged. This sounds obvious, yet it remains one of the most common mistakes during brake jobs. Some modern vehicles with electronic parking brakes require the system to enter service mode using a scan tool or onboard procedure before compression can begin. Attempting to force these electronic calipers manually can destroy the internal motor assembly.
Cleanliness also matters enormously during brake service. Dirt around the piston boot can become trapped inside the caliper during retraction, damaging seals over time. A quick cleaning with brake cleaner and a soft brush helps prevent contamination. Once the assembly is clean and properly prepared, the piston retracts far more smoothly and predictably.
Matching the Correct Adapter to the Caliper Design
Selecting the proper adapter plate is where many first-time mechanics either succeed or become hopelessly frustrated. The piston face tells you everything you need to know if you know how to read it. Those grooves, notches, holes, and indentations are not cosmetic features. They are the engagement points for the caliper compression tool.
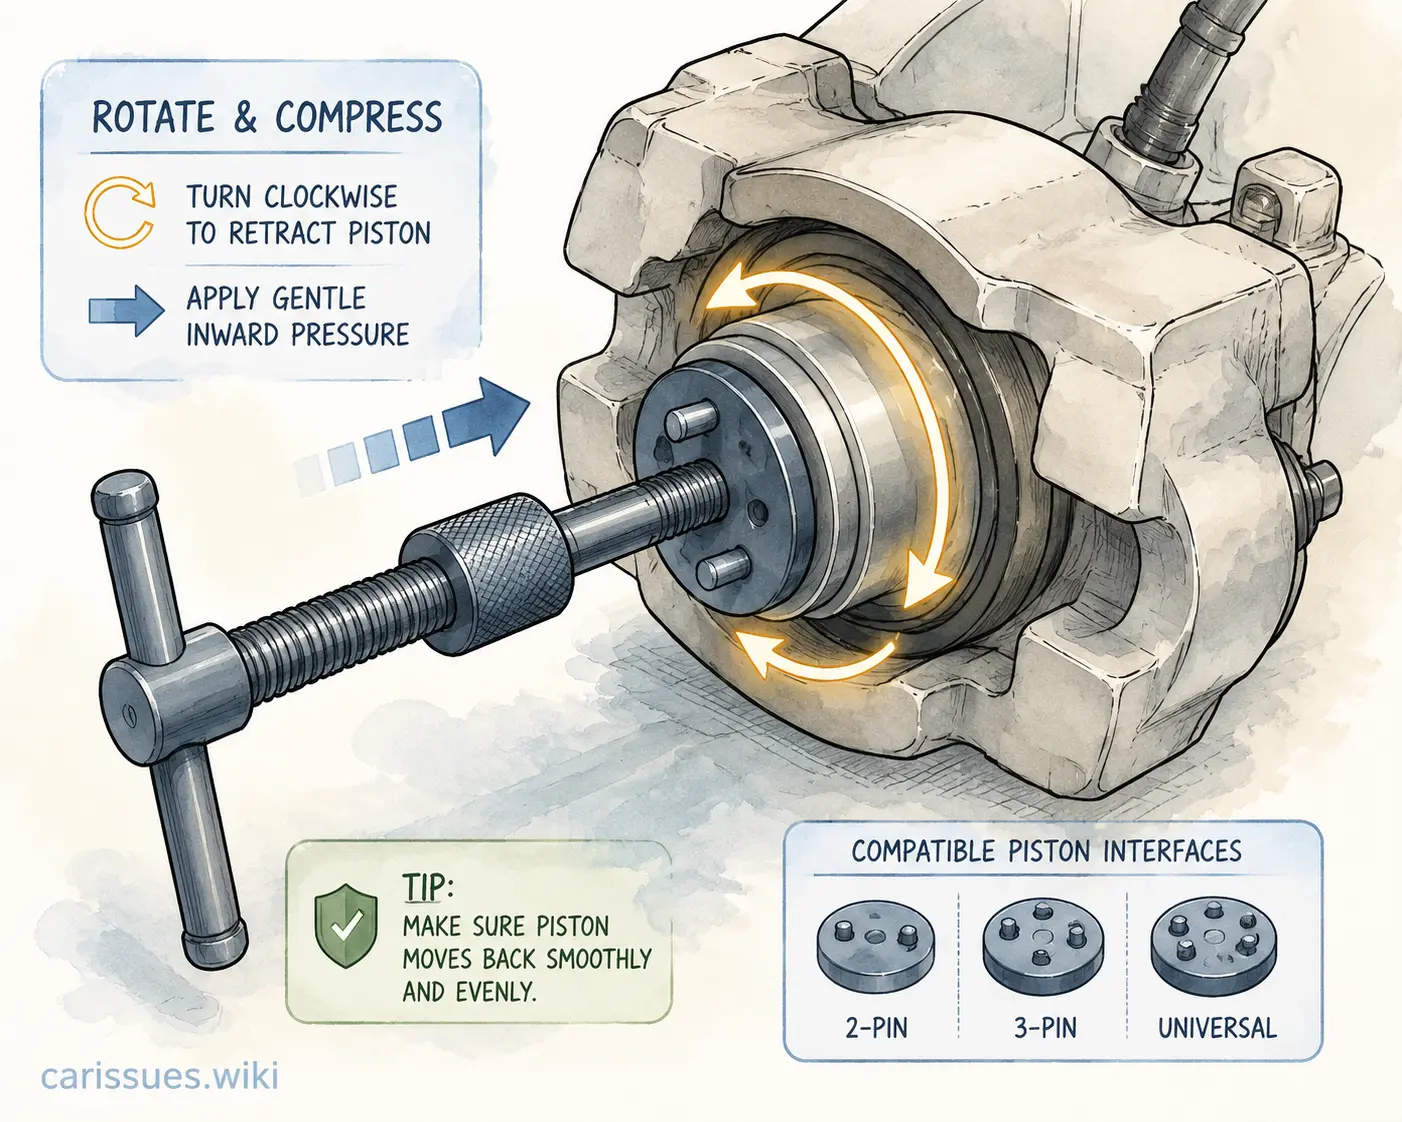
Most rear pistons use either two-pin or four-pin configurations. Some vehicles use narrow vertical slots, while others have shallow recessed holes. The goal is to choose an adapter that fully engages these features without slipping. If the pins only partially contact the piston, the tool will skip during rotation, potentially gouging the piston face or tearing the rubber dust boot.
Tool manufacturers design adapter sets to fit a wide range of brake systems. Many kits label adapters by manufacturer compatibility, including Honda, Ford, Toyota, GM, Subaru, Nissan, and European brands. That said, visual matching often works better than relying entirely on printed charts because brake designs can vary even within the same manufacturer.
A useful trick is lightly seating the adapter against the piston before applying force. If the pins wobble or fail to sit flush, the adapter is incorrect. The right adapter locks into place almost naturally, giving the tool solid engagement. This connection allows smooth, controlled rotation without excessive effort.
Some vehicles create additional confusion because one side uses reverse threads. Certain Ford brake systems, for example, may require opposite rotation directions depending on the side of the vehicle. Trying to force a piston in the wrong direction feels like tightening a bolt endlessly without movement. If resistance becomes extreme, stop immediately and verify the thread direction before continuing.
Choosing the proper adapter is really about respecting the engineering behind the brake system. The tool is designed to work precisely with the piston geometry, not against it. When everything matches correctly, the piston retracts smoothly with surprisingly little effort.
Turning the Piston Without Damaging Components
The actual piston retraction process is where patience separates a clean brake job from an expensive mistake. Many beginners assume more force equals faster progress, but brake pistons reward controlled pressure rather than aggression. The goal is steady compression combined with smooth rotation, almost like threading a cap onto a bottle.
7
Start by positioning the reaction plate against the back of the caliper housing while aligning the adapter pins with the piston slots. Once the tool is seated squarely, begin tightening the forcing screw gradually. The key is simultaneous pressure and rotation. Reddit mechanics discussing stubborn pistons repeatedly emphasize that turning alone is not enough. The piston must be compressed inward while rotating through the internal threaded mechanism.
If the piston feels immovable, resist the temptation to grab an impact gun or oversized pliers. Excessive force can strip internal threads or destroy the parking brake mechanism hidden inside the caliper. Instead, pause and inspect the setup. Is the parking brake disengaged? Is the correct adapter installed? Is the brake fluid reservoir open? Small setup errors create massive resistance during compression.
Pay close attention to the rubber dust boot surrounding the piston. This flexible seal protects the caliper from moisture and debris. If the boot twists, folds, or pinches during retraction, stop immediately and reposition it carefully. Damaged boots allow corrosion to form inside the caliper, eventually causing sticking pistons and uneven brake wear.
Smooth operation is usually a sign that everything is aligned correctly. The piston should retract steadily with moderate hand pressure rather than extreme force. Think of it like tightening a precision mechanical component rather than forcing open a rusted bolt. Controlled movement preserves the internal seals and ensures the caliper continues operating properly once the new pads are installed.
Common Errors That Make Rear Brakes Harder to Install
Rear brake jobs become nightmares surprisingly quickly when a few simple details are overlooked. Most brake installation problems are not caused by defective parts or seized calipers. They usually come from skipped preparation steps, incorrect tool usage, or misunderstanding how the piston mechanism operates.
One of the biggest mistakes is attempting to force the piston straight inward without rotation. Many people who have only worked on front brakes assume all pistons behave the same way. Rear calipers with integrated parking brakes require rotational movement because the piston rides on internal threads. Trying to compress these pistons with a clamp alone often damages the internal screw assembly.
Another major issue involves using makeshift tools. Screwdrivers, pliers, and pry bars may seem convenient, but they create uneven pressure and easily scar the piston face. Tool experts consistently warn that improper tools damage piston seals and boots. Once those seals fail, brake fluid leaks and caliper sticking become almost inevitable.
Electronic parking brake systems introduce an entirely different layer of complexity. Many modern vehicles require a scan tool or electronic service mode before the rear piston can retract safely. Attempting manual compression without disabling the electronic actuator can destroy the motorized mechanism. Some vehicles even require specific ignition and pedal sequences to enter maintenance mode.
Here are some of the most common brake installation mistakes:
- Forgetting to disengage the parking brake
- Using the wrong adapter plate
- Compressing without rotating
- Turning the piston the wrong direction
- Ignoring electronic parking brake procedures
- Failing to open the brake fluid reservoir
- Damaging the dust boot during compression
Another overlooked problem is failing to fully seat the piston before installing new pads. Even a slightly extended piston can make the caliper impossible to reinstall over thicker replacement pads. This often leads people to incorrectly assume the new pads are defective or oversized.
Rear brake systems demand patience and mechanical understanding. Once you stop fighting the design and start working with it properly, the entire process becomes dramatically easier.
How to Tell When the Piston Is Fully Seated
Knowing when the piston is fully retracted is more important than many people think. Stop too early, and the new brake pads will not fit over the rotor properly. Go too far or apply excessive force, and you risk damaging internal components. The sweet spot is full retraction without unnecessary strain.
A properly seated piston usually sits nearly flush with the caliper housing. Depending on the design, slight recessing may still remain visible, but there should be enough clearance for the thicker replacement brake pads. One practical method is to test-fit the caliper over the new pads before final assembly. If the caliper slides into place smoothly without forcing, the piston depth is likely correct.
6
Pay attention to resistance during the final turns of compression. As the piston reaches its seated position, the effort required may increase slightly. That does not mean you should keep forcing it endlessly. Excessive tightening can damage the internal parking brake mechanism or distort the piston seal.
Brake pad alignment also matters during final positioning. Some pistons must align specific slots with locating pins on the back of the brake pad. If the piston orientation is incorrect, the pad may not sit flat against the piston face. This detail is especially common on certain rear caliper designs that use keyed pad retainers.
Visual inspection helps confirm proper seating:
| Inspection Point | What to Look For |
|---|---|
| Piston Depth | Nearly flush with housing |
| Boot Condition | Smooth, untwisted rubber |
| Pad Clearance | Caliper fits without force |
| Piston Orientation | Slots aligned if required |
The process is not about brute strength. It is about reaching the correct mechanical position cleanly and safely. Once the piston sits properly, installing the new pads and reassembling the caliper becomes much easier.
Final Checks Before Reassembling the Brakes
Finishing the brake job correctly matters just as much as retracting the piston properly. Small mistakes during reassembly can lead to noise, uneven wear, reduced braking performance, or even dangerous brake failure. Before bolting everything together, take a few minutes to inspect every component carefully.
Start by examining the caliper slide pins. These pins allow floating calipers to move evenly during braking. Dry or corroded slide pins cause uneven pad wear and sticking brakes. Clean them thoroughly and apply appropriate high-temperature brake grease before reinstalling. According to brake system references, sticking calipers are often caused by corrosion or lack of lubrication around sliding components.
Next, confirm the brake pads sit correctly inside the bracket. Misaligned pads create dragging, squealing, and uneven rotor contact. Make sure all retaining clips are installed securely and that the pads move freely without excessive looseness. Double-check that the piston face contacts the pad properly, especially if alignment notches are required.

Before driving, pump the brake pedal several times slowly. This step is absolutely critical. During piston retraction, the caliper piston moves far away from the rotor. Pumping the pedal restores hydraulic pressure and seats the pads against the rotor surface again. Forgetting this step can create a terrifying moment where the brake pedal drops nearly to the floor during the first attempted stop.
If the vehicle uses an electronic parking brake, reactivate the system according to manufacturer procedures. Some vehicles automatically recalibrate after cycling the ignition, while others require scan-tool commands or manual sequences.
Finally, inspect the brake fluid reservoir and verify the fluid level remains within specification. Brake fluid may rise during piston compression and settle again after the pads seat. Clean any spilled fluid immediately because brake fluid damages painted surfaces quickly.
A successful brake job is not just about installing parts. It is about restoring safe, predictable braking performance. When every step is performed carefully, the result is a quiet, responsive brake system that feels factory fresh.
Conclusion
Using a disc brake caliper tool set correctly transforms rear brake service from a frustrating struggle into a precise mechanical procedure. The biggest lesson many DIY mechanics learn is that rear pistons are not designed to be forced inward recklessly. They often require simultaneous compression and rotation because of the integrated parking brake mechanism hidden inside the caliper. Once you understand that principle, the logic behind the specialized tool kit becomes obvious.
The right adapter plate, proper preparation, controlled pressure, and patience all work together to protect delicate brake components. Trying shortcuts with pliers or clamps may seem tempting, but the risk of damaging seals, boots, or threaded mechanisms is simply not worth it. Modern brake systems are engineered with tighter tolerances and more integrated electronics than ever before, especially on vehicles with electronic parking brakes.
By learning how to identify piston designs, match adapters correctly, and retract pistons safely, you gain far more confidence during brake maintenance. The process stops feeling mysterious and starts feeling methodical. That confidence not only saves money but also helps ensure your braking system performs safely every time you press the pedal.
FAQs
1. Why do rear brake pistons need to rotate while compressing?
Many rear calipers contain integrated parking brake mechanisms that use internal threaded assemblies. The piston must rotate and compress simultaneously to retract correctly without damaging the mechanism.
2. Can I use a C-clamp instead of a brake caliper tool set?
A C-clamp may work on some front calipers, but many rear calipers require rotational retraction. Using only a clamp on these systems can damage the piston or parking brake assembly.
3. What happens if I use the wrong adapter plate?
The tool can slip off the piston face, damaging the piston surface, tearing the rubber boot, or preventing proper piston retraction.
4. How do I know if my vehicle has an electronic parking brake?
Vehicles with electronic parking brakes usually have a dashboard switch instead of a traditional hand lever or foot pedal. These systems often require service mode activation before brake work.
5. Why is my brake piston still hard to retract even with the correct tool?
Common causes include an engaged parking brake, incorrect thread direction, closed brake fluid reservoir, seized caliper components, or failure to place the electronic parking brake into service mode.