

A dead battery in the morning feels a bit like waking up to a phone that somehow lost 100% charge overnight. You parked the car perfectly fine, nothing seemed wrong, and yet the engine barely cranks the next day. That frustrating mystery is often caused by a parasitic draw, one of the most annoying electrical problems modern vehicles can develop. The tricky part is that these drains are usually silent. No smoke, no sparks, no dramatic dashboard warning. Just a battery slowly losing power while the car sits still.
Modern vehicles are packed with electronics. Even when the engine is off, dozens of systems remain partially awake. Your clock, security system, keyless entry receiver, radio memory, and onboard computers continue sipping tiny amounts of electricity. That small drain is completely normal. According to recent automotive electrical references, most vehicles normally draw around 20 to 50 milliamps after shutting down, although some newer vehicles may reach 85 milliamps because of advanced electronics. The real problem begins when a faulty component refuses to “go to sleep” and keeps draining power long after the car is parked.
Finding a parasitic draw may sound intimidating, but it is actually a methodical process. Think of it like detective work. You gather clues, test circuits one at a time, and narrow the suspect list until the guilty component reveals itself. The good news is that you do not need dealership-level equipment to diagnose many battery drain issues. With a quality multimeter, patience, and a systematic approach, you can track down the problem yourself and avoid unnecessary battery replacements.
Understanding What a Parasitic Draw Really Means
A parasitic draw is any electrical current that continues flowing from the battery when the vehicle is turned off. The word “parasitic” sounds dramatic, but not every draw is bad. In fact, every modern car depends on small amounts of continuous power. Without it, your radio presets would disappear, the clock would reset, and engine control modules would lose stored memory every time you shut the engine off.
Why Modern Vehicles Always Use Some Battery Power
Today’s vehicles behave more like rolling computers than traditional machines. Even after removing the key, multiple control modules remain active for several minutes before entering sleep mode. Some systems stay partially awake all the time. Security systems monitor for unauthorized entry, remote start systems wait for signals from your key fob, and body control modules manage standby functions in the background.
Industry sources commonly list a normal resting current between 20 and 50 milliamps, with some luxury or technology-heavy vehicles reaching 75 to 85 milliamps. That tiny electrical demand is harmless when the battery and charging system are healthy. A properly functioning battery can usually support this level of drain for weeks without issue.
When Normal Battery Drain Becomes a Problem
Trouble begins when a component refuses to shut down properly. Imagine leaving a faucet dripping all night. One drop is harmless, but a constant stream slowly empties the tank. Electrical systems behave the same way. A stuck relay, malfunctioning module, glove box light, or aftermarket accessory can continuously consume current and flatten the battery overnight.
Many experts consider anything consistently above 75 to 100 milliamps excessive after the vehicle has fully entered sleep mode. A drain around 250 milliamps can kill a healthy battery in less than two weeks, while larger draws may leave you stranded after only a couple of nights. That is why understanding the difference between normal standby power and abnormal drain is so important.
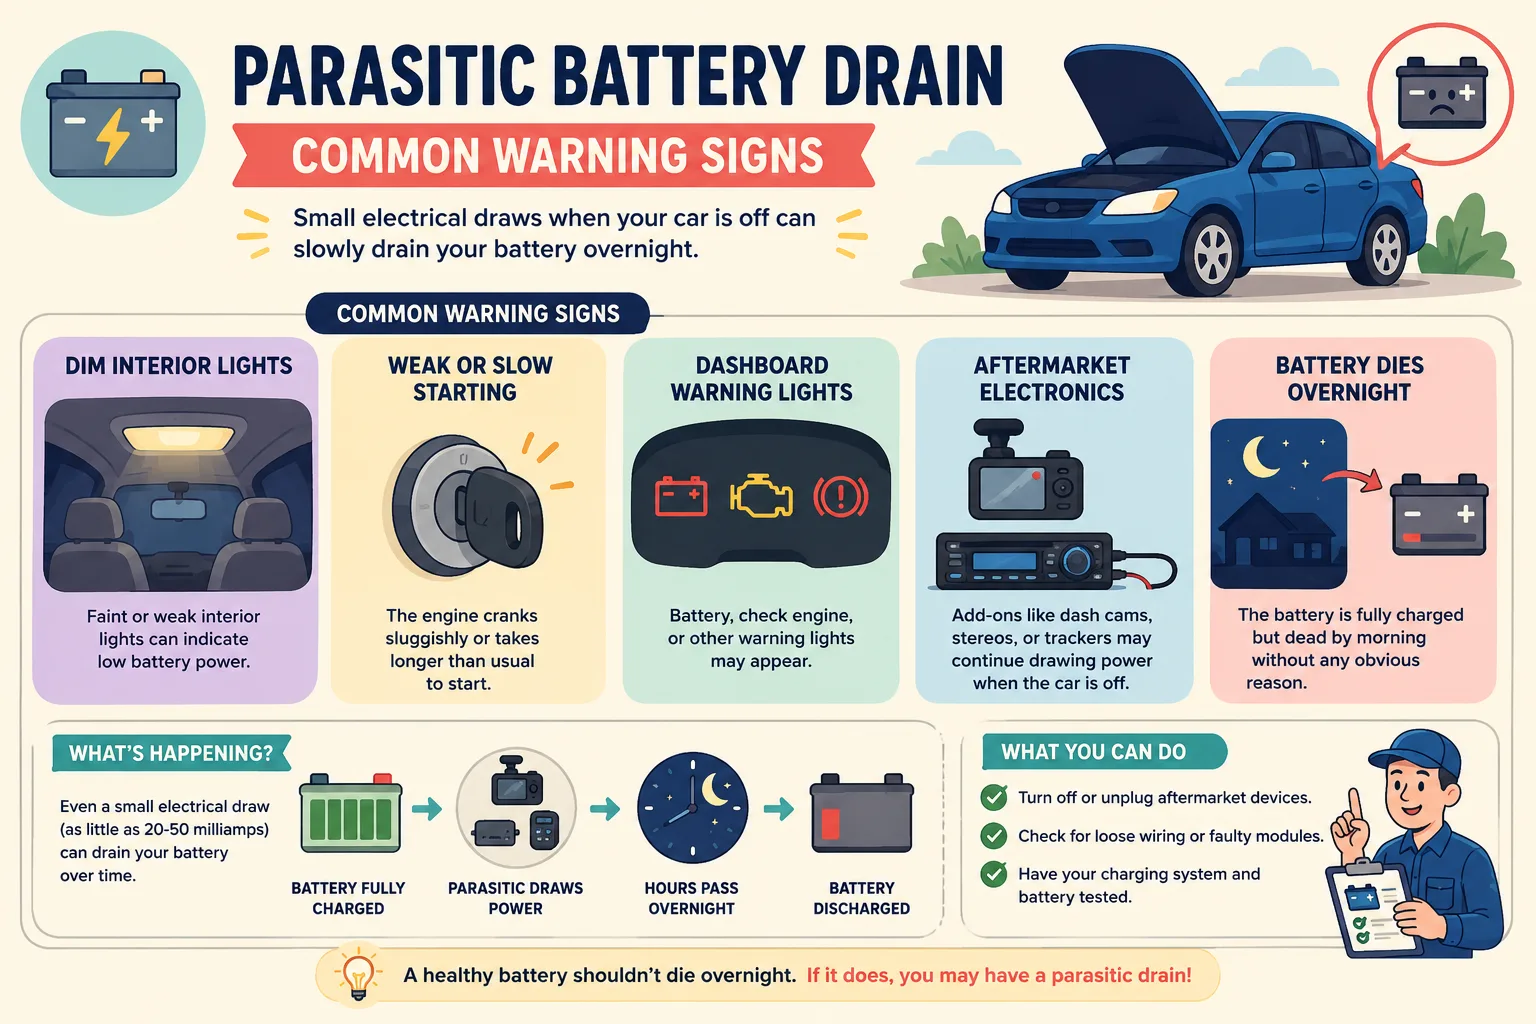
Common Signs Your Car Has an Electrical Drain
Parasitic draws rarely announce themselves loudly. Instead, they create patterns that gradually become impossible to ignore. Drivers often replace batteries or alternators before realizing the real issue is hidden somewhere in the vehicle’s electrical system.
Symptoms That Appear Overnight
The most obvious sign is a battery that repeatedly dies after the vehicle sits parked. Maybe the car starts perfectly every day when driven regularly but struggles after sitting overnight or over a weekend. That pattern is a classic clue. If the alternator tests good and the battery is relatively new, an unseen electrical drain becomes highly suspicious.
Another common symptom is sluggish cranking in the morning. The starter may sound weak or hesitant, almost as if the battery is partially discharged. Some vehicles also display flickering dashboard lights or random warning messages caused by low voltage during startup. In colder weather, these symptoms often become dramatically worse because batteries naturally lose efficiency in low temperatures.
Warning Signs Drivers Often Ignore
Sometimes the clues are subtle. A faint humming sound after shutting the car off may indicate a module staying awake. Interior lights that remain dimly glowing can quietly drain power for hours. You might notice accessories behaving oddly, such as power seats moving slowly or infotainment systems randomly rebooting.
Aftermarket electronics are another major warning sign. Dash cams, audio amplifiers, remote starters, GPS trackers, and poorly installed alarms are among the most common causes of excessive parasitic drain. Many of these accessories are wired directly to constant battery power instead of ignition-switched circuits, allowing them to continue operating long after the engine is off.
Tools Needed to Diagnose a Parasitic Draw
Diagnosing electrical drain safely requires the right tools. The process is not especially difficult, but using improper equipment can damage your meter or even harm vehicle electronics.
Choosing the Right Multimeter
The most important tool is a digital multimeter capable of measuring DC amperage. Ideally, it should have both milliamp and amp settings with fused protection. Cheap meters can work, but quality matters when measuring sensitive electrical loads.
Most technicians begin testing on the 10-amp scale to avoid blowing the meter’s fuse. Once the reading stabilizes, switching to the milliamp range provides more precise measurements. Understanding these readings is essential because the difference between 40 milliamps and 400 milliamps can determine whether your car survives several weeks parked or barely lasts overnight.
<math xmlns=”1 A=1000 mA1text{ A} = 1000text{ mA}
A quality clamp meter designed for low-current measurement can also simplify testing because it avoids disconnecting the battery. Still, the traditional inline multimeter method remains the most common and affordable approach for DIY diagnosis.
Safety Equipment and Preparation Tips
Beyond the meter itself, you should gather a few additional items before testing:
| Tool | Purpose |
|---|---|
| Digital multimeter | Measures current draw |
| Fuse puller | Safely removes fuses |
| Safety gloves | Protects hands during testing |
| Flashlight | Helps inspect fuse panels |
| Battery charger | Keeps battery fully charged |
| Wiring diagram | Identifies affected circuits |
Preparation matters just as much as equipment. The battery must be fully charged before beginning tests. A weak battery can create misleading results and make diagnosis unnecessarily confusing.
Preparing the Vehicle for Testing
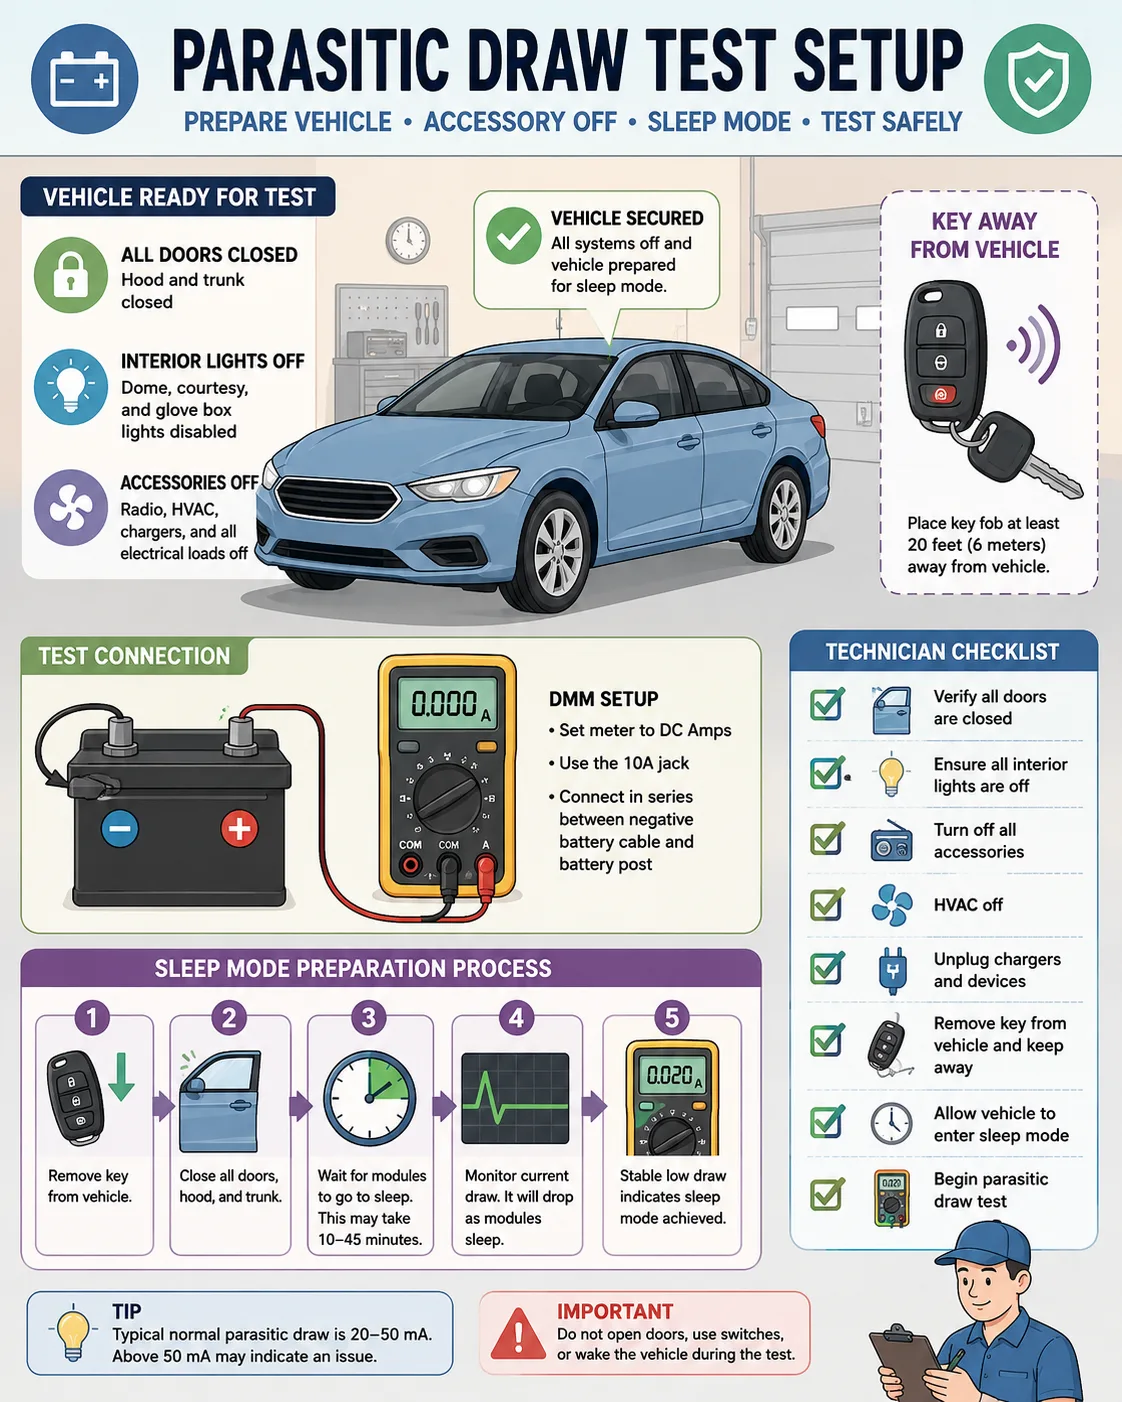
Many failed parasitic draw tests happen because the vehicle was not properly prepared. Modern cars contain dozens of modules that wake up whenever a door opens, a key fob approaches, or interior lighting activates.
Letting the Vehicle Enter Sleep Mode
Before measuring current draw, the vehicle must fully enter sleep mode. Depending on the make and model, this may take anywhere from 15 minutes to over an hour. During this time, onboard computers gradually power down and reduce current consumption to normal standby levels.
This step frustrates many beginners because the current reading initially appears alarmingly high. That is completely normal. Numerous Reddit mechanics and technicians note that readings may briefly spike above one amp before eventually settling near normal levels after the modules go to sleep. Patience is essential here.
Preventing False Readings Before Testing
Even small actions can interrupt sleep mode. Opening a door, pressing a key fob button, or reconnecting the battery incorrectly may instantly wake the vehicle’s control modules and restart the countdown process.
To prevent this:
- Disable interior lights
- Keep doors latched
- Remove the key from proximity range
- Avoid touching switches during testing
- Wait the manufacturer-recommended sleep period
Many technicians manually latch door catches with a screwdriver so the vehicle believes the doors remain closed while they access fuse panels. It feels a bit sneaky, almost like fooling the car into thinking bedtime already started.
Measuring Current Draw Step by Step
Once the vehicle is asleep, the actual testing process becomes straightforward. The goal is to measure how much current flows from the battery while the car is off.
Connecting the Meter Correctly
The standard method involves disconnecting the negative battery cable and placing the multimeter in series between the negative terminal and the cable.
Follow these steps carefully:
- Turn the ignition off
- Remove the key from the vehicle
- Disconnect the negative battery cable
- Set the multimeter to DC amps
- Connect one meter lead to the battery post
- Connect the other lead to the battery cable
- Wait for the reading to stabilize
This setup forces all electrical current to pass through the meter, allowing you to measure the exact amount of draw occurring while the vehicle sits.
Reading and Interpreting Current Values
Interpreting the reading is where diagnosis truly begins. Numbers matter here because small differences dramatically affect battery life.
What Is Considered a Normal Draw
Most healthy vehicles stabilize between 20 and 50 milliamps, though newer vehicles may operate slightly higher due to advanced electronics.
<math xmlns=”0.05 A=50 mA0.05text{ A} = 50text{ mA}
If your reading falls within this range, the battery drain is likely normal.
What Counts as Excessive Drain
Readings above 100 milliamps usually indicate a problem. A 500 milliamp draw is severe and can kill a battery within days.
| Current Draw | Likely Condition |
|---|---|
| 20–50 mA | Normal |
| 75–100 mA | Slightly elevated |
| 150–250 mA | Abnormal |
| 500+ mA | Severe drain |
Understanding these thresholds prevents unnecessary repairs. Sometimes the battery itself is failing rather than suffering from electrical drain.
How to Isolate the Problem Circuit
Finding excessive current is only half the battle. The next step is identifying which circuit causes the drain.
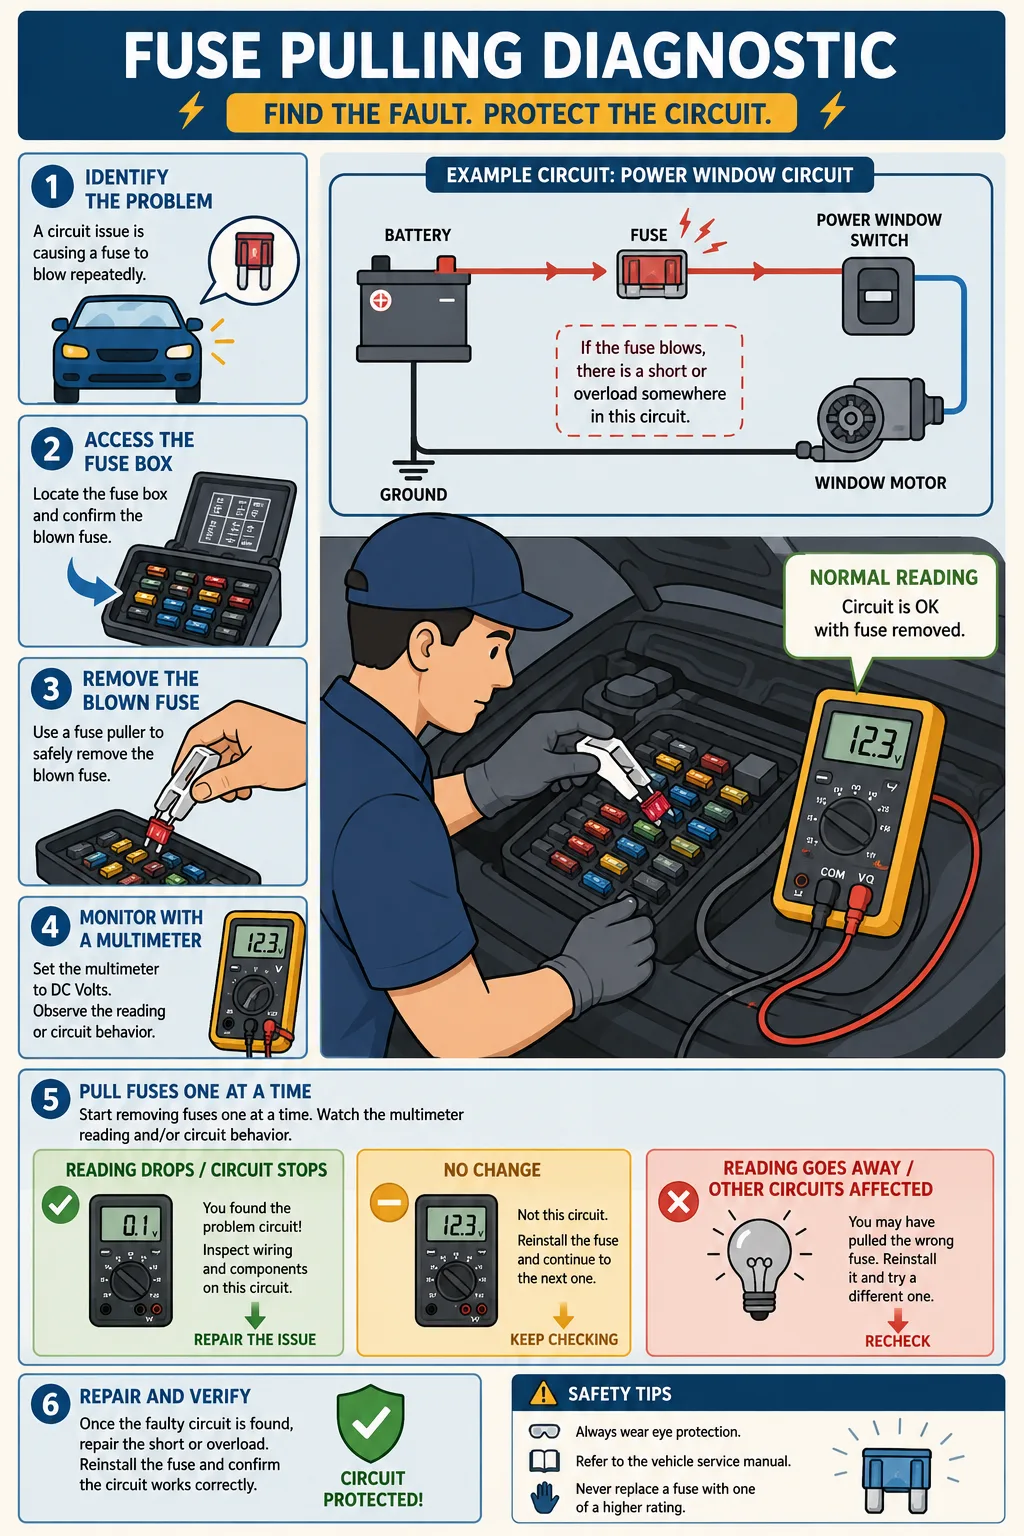
The Fuse Pulling Method
The most common technique is called the fuse pull method. While monitoring the meter, remove one fuse at a time and watch for sudden drops in current.
If the reading instantly falls from 400 milliamps to 30 milliamps after removing a specific fuse, you just identified the problematic circuit. That fuse may control multiple components, but you have dramatically narrowed the search area.
This process requires patience because modern vehicles contain several fuse panels, sometimes hidden behind trim panels or inside the trunk. Keep notes during testing so you do not lose track of which circuits you already checked.
Tracking Down Hidden Electrical Components
Once you identify the affected circuit, inspect every component connected to it. Wiring diagrams become extremely valuable here because multiple devices may share a single fuse.
Common hidden culprits include:
- Trunk lights staying on
- Stuck cooling fan relays
- Faulty infotainment modules
- Seat control modules
- Keyless entry systems
- Audio amplifiers
- OBD-II tracking devices
Electrical diagnosis often feels like peeling layers from an onion. Each discovery leads to another possibility until the true cause finally appears.
Components That Frequently Cause Battery Drain
Certain parts develop a reputation for causing parasitic draws because they commonly fail or remain active unexpectedly.
Interior Lights and Stuck Relays
Simple lighting issues remain surprisingly common. A glove box switch that fails to close can leave a tiny bulb burning continuously. Trunk lights are especially notorious because drivers rarely see them illuminated after closing the lid.
Relays also create frequent problems. A stuck relay behaves like a light switch jammed permanently on. Cooling fan relays, fuel pump relays, and accessory relays sometimes remain energized even after the ignition shuts off, causing substantial battery drain.
Aftermarket Electronics and Faulty Modules
Aftermarket accessories are perhaps the biggest offenders. Recent automotive battery drain reports consistently identify improperly installed alarms, dash cams, remote starters, and audio systems as major causes of parasitic draw.
Control modules themselves can also fail internally. A body control module stuck in a communication loop may prevent the entire network from entering sleep mode. In some cases, software glitches create intermittent drains that appear only occasionally, making diagnosis significantly harder.
Mistakes That Can Give False Test Results
Electrical testing requires precision. Small mistakes can produce completely misleading readings and send you chasing imaginary problems.
Opening Doors During Testing
Opening a door during the test instantly wakes up multiple systems. Interior lights activate, modules power up, and the current reading spikes dramatically. Many beginners mistake this temporary surge for a genuine parasitic drain.
Online mechanic discussions repeatedly mention this issue. Experienced technicians explain that reconnecting the battery or disturbing the vehicle resets sleep mode and temporarily increases current draw. Waiting for systems to power down again is critical.
Incorrect Meter Settings
Incorrect multimeter setup is another common mistake. Accidentally placing the meter leads in the wrong ports or selecting the wrong range can produce confusing readings or blow the internal fuse.
Many DIY testers also misinterpret decimal placement. A reading of 0.388 amps equals 388 milliamps, which is excessive. Confusing amps with milliamps leads to wildly inaccurate conclusions. Always double-check unit conversions before diagnosing a circuit as faulty.
Preventing Future Electrical Drain Problems
Finding and fixing a parasitic draw is satisfying, but prevention saves far more time and frustration in the long run.
Smart Maintenance Habits
Regular battery testing helps catch problems early. Corroded terminals, weak charging systems, and aging batteries all worsen the effects of small electrical drains.
If you install aftermarket electronics, ensure they connect to ignition-switched power whenever possible. Poorly installed accessories frequently become long-term battery killers. Keeping software updated on newer vehicles may also resolve module-related drain issues because manufacturers occasionally release updates addressing sleep-mode problems.
Drivers who store vehicles for extended periods should consider using a battery maintainer. Think of it like a slow IV drip for the battery, gently replenishing charge while the vehicle sits unused.
When Professional Diagnostics Are Worth It
Some parasitic draws are incredibly difficult to diagnose without advanced equipment. Intermittent module failures, CAN bus communication faults, and hidden wiring damage may require professional scan tools and factory service information.
If the drain appears inconsistent or multiple modules remain awake simultaneously, professional diagnostics can save hours of frustration. Skilled automotive electricians often use thermal cameras, amp clamps, and network analysis tools to identify hidden faults quickly.
Conclusion
Tracking down a parasitic draw in a car can seem intimidating at first, but the process becomes manageable once you understand how vehicle electrical systems behave. Every modern car uses a small amount of battery power while parked, yet excessive current draw quickly transforms from harmless standby power into a daily frustration. Weak morning starts, repeatedly dead batteries, and unexplained electrical behavior often point directly toward hidden battery drain.
The key to successful diagnosis is patience and methodical testing. Allow the vehicle to enter sleep mode fully, connect the meter correctly, and isolate circuits carefully using the fuse pull method. Most importantly, avoid common mistakes that wake the vehicle or distort readings. Many parasitic draw issues come from surprisingly simple causes like stuck lights, faulty relays, or aftermarket electronics installed incorrectly.
Electrical systems may feel invisible, but they always leave clues. Once you learn how to interpret those clues, diagnosing battery drain becomes far less mysterious and much more logical. A systematic approach can save money, prevent unnecessary parts replacement, and restore confidence that your vehicle will start every morning without surprises.
Frequently Asked Questions
1. What is considered a normal parasitic draw in a car?
Most vehicles normally draw between 20 and 50 milliamps after entering sleep mode. Some newer vehicles with advanced electronics may operate closer to 85 milliamps without problems.
2. Can a bad alternator cause parasitic drain?
Yes. A faulty alternator diode can allow electricity to flow backward through the charging system after the engine shuts off, creating significant battery drain.
3. How long does it take for a car to enter sleep mode?
It depends on the vehicle. Some cars enter sleep mode within 15 minutes, while others require 45 minutes or more before current stabilizes.
4. Can a parasitic draw damage a new battery?
Absolutely. Repeated deep discharges shorten battery lifespan dramatically, even if the battery itself is brand new.
5. What is the easiest way to find the faulty circuit?
The fuse pull method is usually the fastest DIY approach. Remove one fuse at a time while monitoring current draw until the reading drops significantly.

Marco Vestri is a 29-year-old American content writer based in Spokane, Washington. He specializes in creating well-researched automotive maintenance guides, troubleshooting articles, and practical ownership advice for everyday drivers. His work emphasizes accuracy, clear explanations, and reliable sources, helping readers make informed decisions with confidence. As a regular contributor to carissues.wiki, Marco combines years of blogging experience with a passion for simplifying complex vehicle topics into useful, trustworthy content for a broad audience.